
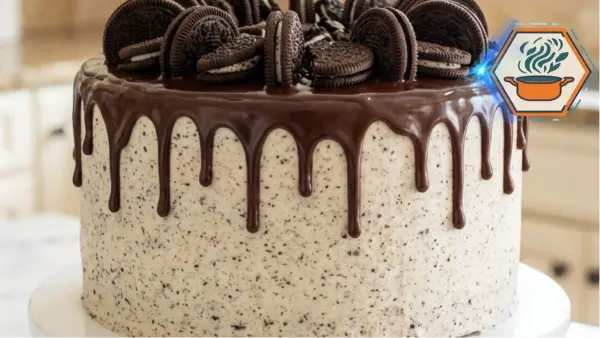
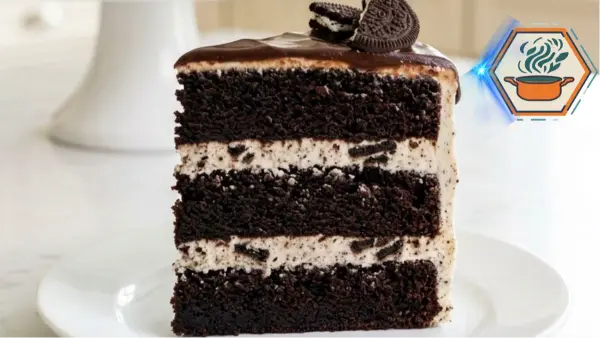
The first slice of a Cookies & Cream Chocolate Layer Cake should feel like a small event. The knife passes through glossy chocolate ganache, creamy speckled frosting, and three dark chocolate cake layers. Then the slice comes away cleanly and reveals those bold black-and-white stripes inside. It looks like a bakery celebration cake, but this version is designed for a home kitchen.
The secret is not simply adding chocolate sandwich cookies to chocolate cake. Each part needs a different texture. The cake should stay soft but strong enough to stack. The cookies and cream frosting needs enough body to hold three layers without becoming heavy. The cookie crumbs should be fine inside the frosting but chunky on top. Finally, the ganache needs to cool before it touches the cake. Those small details create the tall, rustic cake shown here.
Baking also rewards accuracy. Measuring flour correctly, using the right pan size, and watching the cake rather than relying only on a timer can make a noticeable difference. For more baking inspiration, visit RecipesMind. For food-storage guidance, the U.S. Food and Drug Administration recommends keeping perishable foods properly chilled and refrigerating them promptly.
Affiliate disclosure: As an Amazon Associate I earn from qualifying purchases. This article may contain affiliate links to kitchen tools I find useful for preparing this recipe.
JUMP TO
Cookies & Cream Chocolate Layer Cake
A tall, moist chocolate layer cake filled and frosted with fluffy cookies-and-cream cream cheese frosting, finished with glossy semisweet chocolate ganache and crunchy chocolate sandwich cookies.
- Total Time: 2 hours 25 minutes
- Yield: 12 servings
Ingredients
Chocolate Cake
- 2 cups (240 g) all-purpose flour
- 3/4 cup (64 g) unsweetened natural cocoa powder
- 1 3/4 cups (350 g) granulated sugar
- 2 teaspoons baking powder
- 1 1/2 teaspoons baking soda
- 1/2 teaspoon fine salt
- 3 large eggs, room temperature
- 1 cup (240 ml) whole milk, room temperature
- 1/2 cup (120 ml) neutral vegetable oil
- 2 teaspoons vanilla extract
- 3/4 cup (180 ml) hot water
Cookies & Cream Frosting
- 8 oz (226 g) full-fat block cream cheese, softened but still slightly cool
- 1 cup (227 g) unsalted butter, softened
- 4 cups (480 g) powdered sugar
- 2 teaspoons vanilla extract
- 2–3 tablespoons (30–45 ml) heavy cream, as needed
- 12 chocolate sandwich cookies, finely crushed with filling intact
Chocolate Ganache
- 6 oz (170 g) semisweet chocolate, finely chopped
- 1/2 cup (120 ml) heavy cream
For Finishing
- 10–12 whole chocolate sandwich cookies
- 4 chocolate sandwich cookies, roughly crushed
Instructions
- Prepare the oven and pans. Preheat the oven to 350°F (175°C). Grease three 8-inch round cake pans. Line the bottoms with parchment paper and lightly grease the parchment.
- Combine the dry ingredients. Whisk flour, cocoa powder, sugar, baking powder, baking soda, and salt in a large bowl until evenly combined and free of cocoa lumps.
- Add the wet ingredients. Add eggs, milk, vegetable oil, and vanilla. Mix on low speed until combined. Scrape the bowl.
- Add the hot water. Slowly mix in 3/4 cup hot water on low speed. The batter should become quite thin. Do not add extra flour.
- Divide the batter. Divide evenly among the three prepared pans. A kitchen scale gives the most even layers.
- Bake. Bake for 22–27 minutes. Begin checking at 22 minutes. The centers should spring back lightly, and a toothpick should come out with a few moist crumbs but no wet batter.
- Cool completely. Leave the cakes in their pans for 10–15 minutes. Turn onto cooling racks, remove the parchment, and cool completely. For easier stacking, chill the cooled layers for about 30 minutes.
- Prepare the frosting. Beat the softened butter until creamy. Add the cream cheese and mix just until smooth. Gradually beat in the powdered sugar on low speed. Add vanilla. Add heavy cream one tablespoon at a time only until the frosting becomes smooth and spreadable.
- Add the cookies. Finely crush 12 sandwich cookies with their filling intact. Fold the crumbs into the frosting. Keep the pieces fine enough that they will not tear through the frosting during spreading.
- Level the cakes if needed. Trim pronounced domes with a serrated knife. Remove as little cake as possible.
- Fill the cake. Place one cake layer on a cake stand or board. Spread an even layer of cookies-and-cream frosting over it. Add the second cake layer, frost again, then place the third layer on top.
- Crumb coat. Spread a thin layer of frosting over the top and sides. Refrigerate for 15–20 minutes.
- Finish the frosting. Cover the chilled cake with the remaining frosting. Keep the sides thick enough to show the pale cream color and dark cookie speckles.
- Make the ganache. Place chopped chocolate in a heat-safe bowl. Heat 1/2 cup heavy cream until steaming. Pour it over the chocolate. Leave untouched for 2 minutes, then stir gently until completely smooth.
- Cool the ganache. Let it cool until fluid but no longer hot. Keep the frosted cake cold. Test one drip on the back of the cake. It should travel slowly rather than immediately running to the bottom.
- Decorate. Spoon ganache around the top edge to create controlled drips, then spread more across the top. Decorate with whole sandwich cookies and roughly crushed pieces.
- Chill before slicing. Refrigerate for 30–45 minutes. Slice with a sharp knife, cleaning the blade between cuts for defined chocolate-and-cream layers.
Notes
- Use natural unsweetened cocoa powder for the recipe as written.
- Use full-fat block cream cheese, not spreadable tub cream cheese.
- The cake batter is intentionally thin after adding the hot water.
- Cake layers must be completely cool before frosting.
- Chill the layers for easier stacking and fewer crumbs.
- Crush frosting cookies finely but leave decorating cookies chunky.
- Do not add all the heavy cream to the frosting automatically. Add only enough to reach the desired consistency.
- Never pour hot ganache over cream cheese frosting.
- Test one ganache drip before decorating the entire cake.
- Keep the assembled cake refrigerated because it contains cream cheese and heavy cream.
- For clean slices, use a hot, dry knife and wipe it between cuts
- Prep Time: 45 minutes
- Additional/Chilling Time: 1 hour 15 minutes
- Cook Time: 25 minutes
- Category: Dessert
- Method: Baking
- Cuisine: American-inspired
Why This Cookies & Cream Chocolate Layer Cake Works
A tall layer cake needs balance.
If the chocolate sponge is extremely delicate, the layers can compress under the frosting. If it is too dry, the finished slice looks beautiful but is disappointing to eat.
This recipe uses vegetable oil rather than relying only on butter. Oil remains liquid when chilled, which helps the chocolate layers retain a softer mouthfeel after the assembled cake has spent time in the refrigerator.
Hot water is another important part of the batter. It helps produce a thin chocolate batter and disperses the cocoa throughout the mixture. Do not worry when the finished batter looks much looser than a traditional butter-cake batter.
The frosting uses both butter and cream cheese. Butter gives it structure, while cream cheese adds a mild tang that cuts through the sweetness of the powdered sugar and sandwich cookies.
Then comes the contrast: fine cookie crumbs in the frosting and larger pieces on top.
That is what makes every bite interesting.
Ingredients You Will Need
For the chocolate cake layers:
- 2 cups all-purpose flour
- 3/4 cup unsweetened cocoa powder
- 1 3/4 cups granulated sugar
- 2 teaspoons baking powder
- 1 1/2 teaspoons baking soda
- 1/2 teaspoon fine salt
- 3 large eggs, ideally at room temperature
- 1 cup whole milk, ideally at room temperature
- 1/2 cup neutral vegetable oil
- 2 teaspoons vanilla extract
- 3/4 cup hot water
For the cookies and cream frosting:
- 8 ounces full-fat block cream cheese, softened but still cool
- 1 cup unsalted butter, softened
- 4 cups powdered sugar, sifted if lumpy
- 2 teaspoons vanilla extract
- 2 to 3 tablespoons heavy cream
- 12 chocolate sandwich cookies, finely crushed
For the chocolate ganache drip:
- 6 ounces semisweet chocolate, finely chopped
- 1/2 cup heavy cream
For decorating:
- 10 to 12 whole chocolate sandwich cookies
- 4 additional cookies, roughly crushed
One important detail: use block-style cream cheese, not spreadable cream cheese from a tub. Tub products generally contain more moisture and can leave cake frosting much softer.
You can use Oreo cookies or another similar chocolate sandwich cookie. If using another brand, remember that cookie size and filling quantity can differ.
Equipment for a Tall, Clean Layer Cake
You do not need professional bakery equipment, but a few tools make this recipe much easier:
- Three 8-inch round cake pans
- Parchment paper
- Large mixing bowls
- Whisk
- Electric hand mixer or stand mixer
- Flexible spatula
- Offset spatula
- Cooling racks
- Cake board or serving stand
- Small saucepan or microwave-safe bowl for ganache
- Serrated knife, if the layers need leveling
- Kitchen scale, if available
Three matching pans give you the most even layers.
If you only own one or two pans, avoid leaving part of the mixed batter at room temperature for a long period while earlier layers bake. The leavening agents begin working once the wet and dry ingredients meet.
Step 1: Prepare the Pans and Oven
Preheat the oven to 350°F (175°C).
Grease three 8-inch round cake pans. Line each bottom with a circle of parchment paper. Lightly grease the parchment as well.
This extra step matters.
Chocolate cake is dark, so a small section sticking to the pan can be harder to notice until you turn out the layer. Parchment greatly reduces that risk.
Place the oven rack near the center of the oven.
Step 2: Mix the Dry Ingredients
In a large bowl, whisk together the flour, cocoa powder, granulated sugar, baking powder, baking soda, and salt.
Break apart every visible lump of cocoa.
When measuring flour by cups, do not push the measuring cup directly into a packed flour container. Fluff the flour, spoon it into the cup, and level the top. Too much flour is one of the easiest ways to turn a moist chocolate cake into a dense one.
A kitchen scale is even better when you have one.
Step 3: Add the Wet Ingredients
Add the eggs, whole milk, vegetable oil, and vanilla to the dry mixture.
Mix on low speed at first so the cocoa and flour stay in the bowl. Increase to medium-low and mix only until the batter becomes uniform.
Scrape the bottom and sides of the bowl.
Now slowly pour in the hot water while mixing at low speed.
The batter will become thin.
That is expected.
Do not add extra flour to thicken it.
Step 4: Divide and Bake
Divide the batter as evenly as possible among the three prepared pans.
For layers that look especially even when sliced, weigh the filled pans and adjust the batter until each contains roughly the same amount. A compact digital kitchen scale makes this much easier and also helps with accurate flour and sugar measurements.
Bake for 22 to 27 minutes.
Start checking around 22 minutes because ovens differ.
The cakes are ready when the centers spring back lightly when touched and a toothpick inserted near the center comes out with a few moist crumbs rather than liquid batter.
Avoid baking until the toothpick is completely dry. That can mean the cake has gone farther than necessary.
Let the cakes cool in their pans for about 10 to 15 minutes. Carefully turn them onto wire cooling racks and remove the parchment. Good airflow around the layers helps them cool more evenly before assembly. (paid link)
Allow them to become completely cool before frosting.
This is non-negotiable for a stable layer cake. Even slightly warm cake can soften the cream cheese frosting and cause layers to slide.
For easier assembly, wrap the cooled layers and chill them for about 30 minutes. Cold cake is firmer and usually produces fewer crumbs.
Step 5: Make the Cookies and Cream Frosting
The frosting is responsible for the striking speckled appearance of this cake.
Beat the softened butter until smooth and creamy.
Add the cream cheese and beat just until the mixture is smooth. Avoid beating cream cheese frosting for an unnecessarily long time because it can become softer as you work it.
Add the powdered sugar gradually on low speed.
Mix in the vanilla.
Add heavy cream one tablespoon at a time until the frosting reaches a spreadable consistency. You may not need the full amount.
Now prepare the cookies.
For the frosting, crush the 12 chocolate sandwich cookies quite finely. Large pieces can drag through the frosting when you smooth the cake and can make clean spreading difficult.
Fold the crumbs into the frosting by hand.
Stop when the frosting has an obvious cookies-and-cream appearance with dark speckles throughout.
If it feels too soft to support the cake, chill it briefly before assembly rather than adding large amounts of extra sugar.
Step 6: Level the Chocolate Cake Layers
Look across the top of each chilled cake layer.
If the cakes baked with noticeable domes, use a long serrated knife to remove only enough cake to create flatter surfaces.
Do not aggressively trim the layers.
You want to preserve their height and moisture.
Save the scraps. They make an excellent baker’s snack and can also be crumbled over ice cream.
Step 7: Build the Tall Cake
Place the first chocolate layer on a cake board or serving stand.
Spread a generous, even layer of cookies and cream frosting over it. Keep the filling level so the next cake layer has a stable surface.
Add the second chocolate layer.
Repeat with more frosting.
Place the third cake layer on top. For a particularly flat top, place this final layer upside down so the naturally flat bottom becomes the top of your cake.
Press very gently to settle the stack.
Apply a thin crumb coat over the entire cake. This first coating catches loose chocolate crumbs.
Chill the cake for about 15 to 20 minutes.
Then apply the remaining frosting to the top and sides.
The reference style does not require perfectly polished bakery sides. A slightly rustic finish actually suits the thick ganache drips and cookie decoration.
Keep enough frosting on the exterior to create the pale cream color with clearly visible chocolate speckles.
Step 8: Make Glossy Chocolate Ganache
Finely chop the semisweet chocolate and place it in a heat-safe bowl.
Heat the heavy cream until steaming and hot but do not intentionally boil it hard.
Pour the hot cream over the chopped chocolate.
Leave it untouched for about 2 minutes.
Then stir gently from the center outward until the mixture becomes dark, smooth, and glossy.
Now comes one of the most important details in the entire recipe:
Do not pour hot ganache directly onto cream cheese frosting.
Let the ganache cool until it is still fluid but no longer hot.
The cake should also be chilled before the drip is added.
Test a small drip on the back edge of the cake. If it races to the bottom, the ganache is too warm or thin. Wait a few more minutes.
If it barely moves, it has become too cool. Warm it very briefly.
Once the consistency looks right, spoon small amounts around the top edge and let individual drips fall naturally down the sides.
Spread additional ganache across the top.
This controlled approach creates the thick chocolate drips seen on the finished cake rather than a thin chocolate curtain running onto the cake stand.
Step 9: Add the Cookie Decoration
While the ganache is still slightly soft, arrange whole sandwich cookies on top.
Place some upright and allow others to lean against them.
Scatter roughly crushed cookie pieces around the center.
Keep these decorating pieces much larger than the crumbs used inside the frosting.
That difference is deliberate.
The fine crumbs flavor the frosting without disturbing its creamy texture. The chunky pieces on top provide visible crunch and make the cake immediately recognizable as cookies and cream.
Do not cover every inch of ganache with crumbs. Leaving glossy chocolate visible makes the decoration look richer and less crowded.
The Final Chill Makes a Difference
Refrigerate the assembled cake for 30 to 45 minutes before slicing.
This gives the frosting and ganache time to firm up and helps create the dramatic, distinct layers you want when the first slice is removed.
Use a long, sharp knife.
For cleaner slices, dip the blade in hot water, wipe it completely dry, make one cut, then clean it before the next cut.
That small technique makes the dark cake and pale filling look much sharper on the plate.
Common Mistakes to Avoid
Frosting warm cake: Even a little residual warmth can soften the frosting.
Overbaking the layers: Check early. Chocolate cake can become dry before it looks obviously overdone.
Adding too much flour: Measure carefully and never pack flour into the cup.
Using coarse cookie pieces in the frosting: Save large pieces for decoration.
Making the frosting too thin: Add heavy cream gradually. You can always add more.
Pouring hot ganache onto the cake: Cool both the cake and ganache first.
Skipping the crumb coat: Dark chocolate crumbs show easily against pale frosting.
Cutting immediately after assembly: A short refrigerator rest creates a more stable slice.
How to Store Cookies & Cream Chocolate Layer Cake
Because this cake contains cream cheese frosting and heavy cream, keep it refrigerated.
The FDA recommends keeping refrigerators at 40°F (4°C) or below and refrigerating perishable foods promptly. It also advises against leaving perishable foods at room temperature for more than two hours, or one hour when temperatures are above 90°F (32°C).
Cover the cake well so the exposed chocolate layers do not dry out or absorb refrigerator odors.
For the best eating texture, you can take an individual slice from the refrigerator shortly before serving. Do not leave the entire cake sitting out for extended periods.
Can You Make It Ahead?
Yes. In fact, dividing the recipe across two days can make assembly easier.
Bake the chocolate layers one day ahead. Once completely cool, wrap each layer tightly and refrigerate it.
The next day, prepare the frosting, assemble the layers, chill the cake, make the ganache, and decorate.
This method removes the temptation to frost cake layers before they have fully cooled.
If you enjoy learning the small details that improve homemade cakes, our guide to the difference between butter cake and other cakes offers more useful baking context. You can also read our tips on the secret to crunchy cookies when you want another cookie-focused dessert.
What Does This Cake Taste Like?
The first flavor is deep chocolate.
Then comes a sweet vanilla-and-cream-cheese filling with tiny pieces of chocolate cookie. The semisweet ganache adds another layer of chocolate without turning the whole dessert into pure sweetness.
Finally, the cookie pieces on top bring the crunch.
Serving the cake chilled gives it a firmer, almost bakery-style texture. Letting a slice stand briefly before eating makes the cake and frosting softer.
Both are good. It simply depends on the texture you prefer.
FAQs About Cookies & Cream Chocolate Layer Cake
Can I make this cake with only two pans?
Yes, but the baking time and finished layer thickness will change. Do not overfill the pans. For the tall three-layer appearance shown here, three 8-inch pans are the simplest option.
Why is my chocolate cake dry?
The most common causes are too much flour, excessive baking time, or an oven that runs hotter than its displayed temperature. Measure flour carefully and begin checking the layers at the lower end of the baking range.
Can I use Dutch-process cocoa powder?
The recipe’s leavening system was written around unsweetened cocoa powder. Natural and Dutch-process cocoa do not always behave identically because their acidity differs. For the most predictable result, use the type specified rather than making an untested substitution.
Why did my cake layers slide?
The cake or frosting was probably too warm, the filling may have been too soft, or too much filling was placed between the layers. Chill the cake layers and keep the frosting thick enough to hold its shape.
How do I stop ganache from running down the entire cake?
Let the ganache cool before applying it and chill the frosted cake first. Test one drip before decorating the whole edge. A good drip should move slowly and stop before reaching the cake stand.
Should I remove the cream filling from the sandwich cookies?
No. For this recipe, crush the sandwich cookies with their filling intact. It contributes to the classic cookies-and-cream flavor.
How finely should I crush the cookies?
Use fine crumbs for the frosting and coarse pieces for the top. This creates the speckled exterior while preserving crunchy pieces in the decoration.
Can I make the cake the day before serving?
Yes. This is a useful make-ahead dessert. Keep the finished cake covered and refrigerated because the frosting contains cream cheese. The FDA recommends a refrigerator temperature of 40°F (4°C) or below.
A Tall Cake Worth the Extra Steps
A great Cookies & Cream Chocolate Layer Cake is not difficult because of one complicated technique. It succeeds because several simple details happen at the right time.
Cool the chocolate layers fully. Keep the frosting thick enough to support the stack. Crush the filling cookies finely. Chill the crumb coat. Let the ganache cool before creating the drips. Then use larger cookie pieces on top for contrast.
Follow those details and the final slice has everything this cake promises: dark, moist chocolate layers, thick cookies-and-cream filling, visible cookie speckles, glossy ganache, and crunchy sandwich cookies on top.
It is tall. It is rich. And when that first slice comes out and exposes all three chocolate layers, it looks every bit as impressive as the cake you set out to make.