
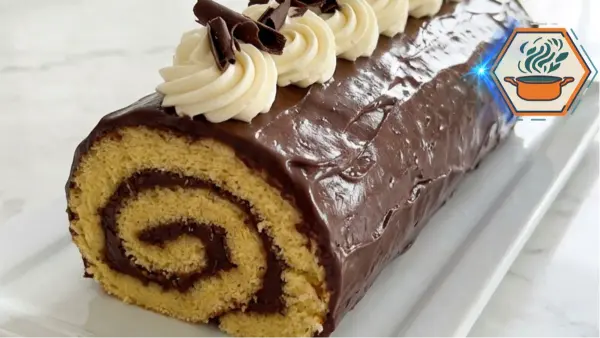
There is a special moment when you cut the first slice of a homemade Chocolate Vanilla Swiss Roll. The knife passes through a glossy chocolate coating, then reveals a golden vanilla sponge wrapped around a dark chocolate spiral. Add soft vanilla cream swirls and a few chocolate curls on top, and a simple cake suddenly looks ready for a celebration.
The beautiful spiral may make this dessert look difficult. It does not have to be. The real secret is timing. A thin sponge needs enough air to stay light, enough moisture to remain flexible, and an early roll while it is still warm. Baking references for rolled cakes also stress that overbaking makes a thin sponge more likely to crack. If you enjoy learning the small details that change the result of a bake, the RecipesMind home page has more practical cooking guides.
This version combines a light vanilla sponge with chocolate cream and a smooth ganache. That balance matters. The cake stays soft rather than becoming a heavy chocolate dessert. The filling creates the dark spiral, while the outer ganache gives each slice a richer finish. For more baking technique, our guide to mastering caramelized sugar covers another useful dessert skill. Rolled-cake methods vary, but baking the thin sponge briefly and avoiding excessive baking are recurring recommendations.
Affiliate disclosure: As an Amazon Associate I earn from qualifying purchases. This article may contain affiliate links to kitchen tools I find useful for preparing this recipe.
JUMP TO
Chocolate Vanilla Swiss Roll
A soft vanilla sponge rolled around a silky chocolate cream filling, covered with glossy semisweet chocolate ganache, and finished with vanilla whipped cream swirls and chocolate curls. Rolling the sponge while warm helps create a defined spiral with fewer cracks.
- Total Time: About 2 hours 20 minutes
- Yield: 1 roll, about 10 slices
Ingredients
Vanilla Sponge
- 4 large eggs, room temperature
- 3/4 cup (150 g) granulated sugar
- 1 teaspoon vanilla extract
- 3/4 cup (90 g) all-purpose flour
- 1 teaspoon baking powder
- 1/4 teaspoon fine salt
- 2 tablespoons (30 ml) whole milk
- 2 tablespoons (28 g) unsalted butter, melted and slightly cooled
Chocolate Filling
- 3/4 cup (180 ml) heavy cream, divided
- 4 oz (113 g) semisweet chocolate, finely chopped
- 2 tablespoons (15 g) powdered sugar
- 1/2 teaspoon vanilla extract
Chocolate Ganache
- 6 oz (170 g) semisweet chocolate, finely chopped
- 2/3 cup (160 ml) heavy cream
- 1 tablespoon (14 g) unsalted butter
Vanilla Cream Topping
- 3/4 cup (180 ml) cold heavy cream
- 2 tablespoons (15 g) powdered sugar
- 1/2 teaspoon vanilla extract
For Finishing
- 2 oz (57 g) milk or semisweet chocolate, for curls
- Powdered sugar, optional
Instructions
- Prepare the oven and pan. Preheat the oven to 350°F (175°C). Lightly grease a 10 × 15-inch jelly roll pan. Line it with parchment paper and lightly grease the parchment.
- Whip the eggs. Beat the room-temperature eggs and granulated sugar with an electric mixer for about 5–6 minutes, until very pale, thick, and increased in volume. The mixture should briefly hold a ribbon when the beaters are lifted. Mix in the vanilla.
- Add the dry ingredients. Sift together the flour, baking powder, and salt. Fold them gently into the egg mixture in two additions. Stop as soon as no visible dry flour remains.
- Add the milk and butter. Combine the milk with the melted, slightly cooled butter. Mix about 1/2 cup of cake batter into this liquid first. Gently fold the lightened mixture back into the remaining batter. This makes it easier to incorporate the fat without knocking excessive air from the eggs.
- Bake. Spread the batter evenly into the prepared pan, including the corners. Bake for 10–12 minutes, or until the surface is lightly golden and springs back when gently touched. Do not deliberately brown or dry the sponge.
- Roll while warm. While the cake is baking, place a clean lint-free kitchen towel on the counter and dust it lightly with powdered sugar. Turn the baked sponge onto the towel while still warm. Carefully remove the parchment.
- Shape the sponge. Starting from one short end, gently roll the warm cake with the towel inside. Do not compress it tightly. Place seam-side down and allow it to cool completely, about 45–60 minutes.
- Prepare the chocolate filling. Put the 4 oz chopped chocolate in a heatproof bowl. Heat 1/4 cup (60 ml) of the filling cream until steaming. Pour it over the chocolate. Leave for 2 minutes, then stir until smooth. Cool to room temperature.
- Whip the filling. Whip the remaining 1/2 cup (120 ml) cold heavy cream with 2 tablespoons powdered sugar and 1/2 teaspoon vanilla until medium peaks form. Fold a small portion into the cooled chocolate, then gently fold in the remainder. If the filling is too soft to spread, refrigerate for 5–10 minutes.
- Fill the cake. Carefully unroll the completely cooled sponge without forcing the tight inner curve flat. Spread the chocolate filling evenly over it, leaving about a 1/2-inch border.
- Roll again. Roll the filled cake from the same short end, this time without the towel. Place seam-side down and refrigerate for 30 minutes.
- Make the ganache. Place 6 oz chopped semisweet chocolate in a bowl. Heat 2/3 cup heavy cream until steaming. Pour it over the chocolate and leave for 2 minutes. Stir gently until smooth, then stir in 1 tablespoon butter.
- Coat the roll. Allow the ganache to cool until it becomes slightly thicker but remains pourable. Pour or spoon it over the chilled roll. Let some chocolate fall naturally down the sides. Refrigerate until the ganache is set enough to decorate.
- Make the vanilla topping. Whip 3/4 cup cold heavy cream with 2 tablespoons powdered sugar and 1/2 teaspoon vanilla until firm piping peaks form.
- Decorate. Pipe loose vanilla cream swirls along the top of the cake. Make curls or irregular shards from the remaining chocolate and place them around the cream.
- Chill and slice. Chill until the filling and coating are firm enough for clean cutting. Slice with a clean serrated knife, wiping the blade between cuts.
Notes
- Do not overbake the sponge. A dry, thin cake is much more likely to crack.
- Roll the sponge while it is still warm. Do not wait until it has cooled flat.
- Room-temperature eggs help create good volume during whipping.
- Fold the flour gently to preserve the air in the egg foam.
- Do not add hot chocolate to whipped cream. Let the chocolate mixture cool first.
- Do not force the cooled sponge completely flat when unrolling it.
- Let the ganache thicken before coating the cake. Very warm ganache will run onto the serving plate instead of clinging to the roll.
- Keep the finished cake refrigerated because both the filling and topping contain whipped cream.
- For neat slices, chill the roll first and wipe the knife between cuts.
- Prep Time: 40 minutes
- Additional/Chilling Time: 1 hour 30 minutes
- Cook Time: 10–12 minutes
- Category: Dessert
- Method: Baking
- Cuisine: European-inspired / Swiss roll
Why This Chocolate Vanilla Swiss Roll Works
A good cake roll needs three things at the same time: softness, structure, and flexibility.
The eggs provide much of that structure. Beating room-temperature eggs with sugar traps tiny air bubbles. During baking, those bubbles expand and help create a light sponge.
This is why the egg-and-sugar stage should not be rushed.
The finished mixture should look pale and thick. When you lift the beaters, the mixture should fall back into the bowl in a ribbon that remains visible briefly before disappearing.
Flour then gives the sponge enough structure to hold together. Milk and melted butter add tenderness and flavor. Because the cake is thin, however, it can lose moisture quickly. A few extra minutes in the oven can make a noticeable difference.
The warm pre-roll is equally important. Rolling the sponge shortly after baking gives it the curved shape it will need later. Other Swiss roll methods use the same principle of shaping the cake while warm, before adding the final filling.
Ingredients You Will Need
For the Vanilla Sponge
- 4 large eggs, at room temperature
- 3/4 cup (150 g) granulated sugar
- 1 teaspoon pure vanilla extract
- 3/4 cup (90 g) all-purpose flour
- 1 teaspoon baking powder
- 1/4 teaspoon fine salt
- 2 tablespoons whole milk
- 2 tablespoons (28 g) unsalted butter, melted and slightly cooled
Room-temperature eggs are easier to whip into a voluminous foam than very cold eggs. If yours are refrigerated, place the uncracked eggs in a bowl of warm—not hot—water for about 5 to 10 minutes.
Do not pour piping-hot melted butter into the batter. Let it cool until it is fluid but only slightly warm.
For the Chocolate Filling
- 3/4 cup (180 ml) cold heavy cream, divided
- 4 ounces (113 g) semisweet chocolate, finely chopped
- 2 tablespoons powdered sugar
- 1/2 teaspoon vanilla extract
Semisweet chocolate gives the filling enough chocolate flavor without making every bite overly sweet.
For the Chocolate Ganache
- 6 ounces (170 g) semisweet chocolate, finely chopped
- 2/3 cup (160 ml) heavy cream
- 1 tablespoon unsalted butter
The butter is useful here. It gives the finished coating a softer texture and attractive sheen.
For the Vanilla Cream Topping
- 3/4 cup (180 ml) cold heavy cream
- 2 tablespoons powdered sugar
- 1/2 teaspoon vanilla extract
For Decorating
- 2 ounces milk or semisweet chocolate
- Powdered sugar, optional
Chocolate curls do not need to look identical. Thin shards, loose curls, and irregular pieces give the finished roll the homemade appearance shown in our serving style.
Equipment That Makes the Recipe Easier
Have everything ready before you begin.
You will need:
- A 10 × 15-inch jelly roll pan. A sturdy aluminum pan such as the Nordic Ware Natural Jelly Roll Pan is a practical choice because its baking surface is close to the size used for this recipe.
- Parchment paper
- An electric hand mixer or stand mixer. A multi-speed model such as the KitchenAid 7-Speed Hand Mixer makes it easier to whip the eggs to ribbon stage and prepare the cream topping without relying on one fixed speed
- Large mixing bowl
- Fine-mesh sieve
- Flexible silicone spatula
- Clean, lint-free kitchen towel
- A small offset spatula, such as the Ateco 1385 Offset Spatula, for spreading the thin sponge batter and chocolate filling evenly without digging into the cake.
- Small saucepan
- Mixing bowls
- Piping bag and star tip, if desired
- Serrated knife
Pan size matters. Using a much smaller pan creates a thicker cake that needs a different baking time and may be harder to roll into the same tight spiral.
How to Make Chocolate Vanilla Swiss Roll
1. Prepare the Pan and Oven
Preheat the oven to 350°F (175°C).
Lightly grease a 10 × 15-inch jelly roll pan. Line the bottom with parchment paper, leaving enough paper to help release the sponge.
Lightly grease the parchment as well.
Do this before whipping the eggs. Once the batter is airy, you want to get it into the oven without unnecessary waiting.
2. Whip the Eggs and Sugar
Place the room-temperature eggs and granulated sugar in a large bowl.
Beat with an electric mixer on medium-high to high speed for about 5 to 6 minutes.
Do not judge this stage only by the clock. Look at the mixture.
It should be:
- Pale yellow
- Much larger in volume
- Thick and airy
- Able to form a temporary ribbon when lifted
Beat in the vanilla only until combined.
This trapped air is a major part of the sponge’s light texture.
3. Add the Dry Ingredients Carefully
Sift the flour, baking powder, and salt together.
Sift about half over the whipped egg mixture. Fold gently with a large spatula. Rotate the bowl as you fold.
Add the remaining dry ingredients and continue folding only until you can no longer see obvious streaks of flour.
Do not stir vigorously.
Aggressive mixing can knock out the air you spent several minutes creating.
4. Add the Milk and Butter Without Deflating the Batter
This small step deserves more attention than it often gets.
Combine the milk and melted, slightly cooled butter.
Instead of pouring this mixture directly across the entire bowl, take about 1/2 cup of cake batter and gently mix it into the milk and butter first.
Then fold that lighter mixture back into the main batter.
This makes the fat easier to incorporate without immediately sinking to the bottom.
Fold only until even.
5. Bake the Vanilla Sponge
Immediately spread the batter into the prepared pan.
Use an offset spatula to push it gently into the corners and create an even layer.
Bake for approximately 10 to 12 minutes.
Start checking at 10 minutes because ovens vary.
The sponge is ready when the surface is lightly golden and the center springs back after a very gentle touch. Do not wait for a dark crust.
For a Swiss roll, a deeply browned, dry exterior is not the goal. You need a thin, flexible cake.
Overbaking is one of the most common causes of cracking in rolled cakes.
The Most Important Step: Roll It While Warm
While the cake bakes, spread a clean lint-free kitchen towel on the counter and dust it very lightly with powdered sugar.
As soon as the sponge comes out of the oven, loosen any stuck edges.
Carefully invert it onto the towel.
Peel away the parchment slowly. Do not pull upward aggressively. Pull it back close to the surface of the cake.
Starting at a short end, gently roll the warm sponge together with the towel.
Do not squeeze it into a hard cylinder.
You want a snug roll that teaches the sponge its future shape without crushing it.
Place it seam-side down and let it cool completely.
This warm shaping technique is widely used for Swiss rolls because the cake is more pliable before it cools.
Make the Silky Chocolate Filling
Place the finely chopped chocolate in a heatproof bowl.
Heat 1/4 cup of the heavy cream until steaming but not aggressively boiling. Pour it over the chocolate.
Wait about 2 minutes.
Stir slowly from the center outward until smooth.
Let this chocolate mixture cool to room temperature. It must remain fluid, but it should not be warm enough to melt whipped cream.
Whip the remaining 1/2 cup cold heavy cream with the powdered sugar and vanilla until medium peaks form.
Fold a small amount of whipped cream into the cooled chocolate first. Then gently fold in the rest.
The result should be airy enough to spread but firm enough to stay inside the cake.
If it seems very soft, refrigerate it for 5 to 10 minutes before assembly.
Create the Signature Chocolate Spiral
Once the sponge is completely cool, gently unroll it.
Do not force the innermost curl perfectly flat. Doing so can create a crack.
Spread the chocolate filling in a thin, even layer. Leave about a 1/2-inch border around the edges and a slightly larger border at the far end.
Too much filling can squeeze out when you roll.
Starting from the same short end as before, roll the cake again. This time, do not include the towel.
Keep the roll snug, but do not press down hard.
Place it seam-side down.
Chill for about 30 minutes. This helps the filling firm and makes the cake easier to coat.
Make the Glossy Chocolate Ganache
Finely chop the semisweet chocolate and place it in a heatproof bowl.
Heat the heavy cream until it begins to steam and small bubbles appear near the edge.
Pour the hot cream over the chocolate.
Leave it untouched for 2 minutes.
Then stir slowly until smooth. Add the tablespoon of butter and stir until glossy.
Now comes an important visual detail.
Do not pour very hot, thin ganache over the cake.
Let it cool until slightly thickened. It should still flow from a spoon, but slowly.
Place the chilled roll on a wire rack over a tray or directly on its serving platter if you are comfortable controlling the pour.
Spoon or pour the ganache along the top. Gently encourage it toward the sides.
For the rustic appearance of this cake, you do not need a perfectly polished mirror finish. Slow, slightly uneven drips give it character.
Add the Vanilla Cream Swirls
Whip the cold heavy cream with powdered sugar and vanilla.
Stop when it reaches firm piping peaks.
Avoid taking it too far. Overwhipped cream becomes grainy and can eventually begin turning buttery.
Transfer the cream to a piping bag fitted with a star tip. If you bake often, a reusable decorating set such as the Wilton piping tip set gives you several star shapes for creating the loose cream swirls used on this cake.
Pipe generous, loose swirls along the top of the chilled ganache.
Finish with irregular chocolate curls or shards.
To make simple curls, run a vegetable peeler along the edge of a room-temperature chocolate bar. If the chocolate is too cold, it may break into tiny fragments instead.
How to Keep a Swiss Roll From Cracking
Cracks usually come from technique rather than one mysterious missing ingredient.
Pay attention to these points:
- Do not overbake. A dry sponge loses flexibility.
- Whip the eggs properly. The foam creates the light structure.
- Fold gently. Rough mixing removes valuable air.
- Keep the sponge thin and even. Thick spots bake differently.
- Roll while warm. Do not wait until the cake is cold.
- Cool it in its rolled shape.
- Do not force the cooled sponge completely flat.
- Avoid an excessively thick filling.
Some rolled-cake formulas use oil because it remains fluid at room temperature and can contribute to flexibility. Our version keeps butter for its classic vanilla-cake flavor, so careful baking and warm rolling become particularly important.
If you enjoy troubleshooting cakes, see our guide to the difference between butter cake styles for more insight into how cake ingredients affect texture.
How to Get Clean, Beautiful Slices
The first cut is where all your work becomes visible.
Chill the finished roll before slicing. This firms the filling and ganache.
Use a long serrated knife.
For each slice:
- Warm the blade briefly in hot water.
- Wipe it completely dry.
- Cut with gentle sawing motions.
- Clean the blade before the next slice.
A warm, clean knife is also recommended in other Swiss roll methods for neater chocolate-filled slices.
Aim for slices about 3/4 to 1 inch thick.
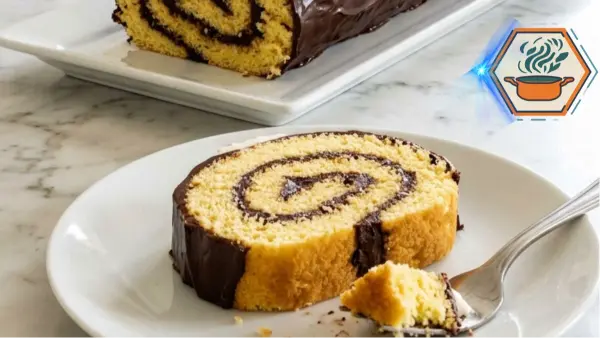
That gives you a clear golden spiral surrounded by chocolate without making each serving too large.
Storage and Make-Ahead Tips
Because this cake contains whipped cream, keep it refrigerated.
Store it in a covered cake container or other airtight container so the exposed sponge does not dry out or absorb refrigerator odors.
For the nicest appearance, decorate with the final cream swirls and chocolate curls after the ganache has set.
Before serving, you can let an individual slice sit briefly at cool room temperature. The ganache will soften slightly and the sponge will taste more tender.
Do not leave a cream-filled cake sitting out for long periods.
Common Mistakes to Avoid
My Sponge Cracked
It was likely overbaked, allowed to cool flat, or rolled too aggressively.
A small surface crack is not a disaster. Ganache can cover minor imperfections.
My Cake Is Dense
The eggs may not have been whipped enough, or too much air may have been lost while folding in the flour and butter.
My Chocolate Filling Is Runny
The chocolate mixture may still have been warm when it was folded into the whipped cream.
Cool the chocolate first.
My Ganache Runs Onto the Plate
It is probably too warm.
Let it stand for several minutes and test a spoonful. You want a slow ribbon rather than a watery stream.
My Filling Squeezes Out
Either the layer is too thick or the roll is being squeezed too firmly.
Leave a border and use gentle pressure.
Why This Dessert Is Worth Making
This Chocolate Vanilla Swiss Roll has the kind of contrast that makes a dessert memorable.
The sponge is golden and light. The inner chocolate layer forms a defined dark spiral. The ganache adds richness without changing the vanilla character of the cake itself. Finally, the piped vanilla cream and chocolate curls give the top height and texture.
It also teaches several useful baking skills in one recipe: whipping eggs to ribbon stage, folding without deflating batter, handling a thin sponge, making ganache, whipping cream, and rolling a cake without breaking it.
Once you understand those steps, cake rolls become far less intimidating.
Frequently Asked Questions
Why does a Swiss roll crack when rolling?
The most common reasons are overbaking and rolling after the sponge has cooled flat. Thin cake loses moisture quickly. Shape it while warm and avoid baking it until dry.
Should I roll a Swiss roll hot or cold?
Roll the plain sponge while it is still warm, using the towel to help shape it. Let it cool in that position. Unroll it gently once cool, add the filling, then roll it again.
Can I make Chocolate Vanilla Swiss Roll the day before?
Yes. In fact, chilling gives the filling time to firm and makes slicing easier. Keep the cake covered and refrigerated because it contains fresh cream.
Why do I need room-temperature eggs?
They whip readily into a stable, voluminous mixture, which helps give this thin sponge its airy texture.
Can I use milk chocolate instead of semisweet chocolate?
Yes, but the result will be sweeter. Semisweet chocolate gives a stronger contrast against the vanilla sponge and sweetened cream.
Can I skip the ganache?
Yes. The roll can be served with powdered sugar instead. However, the ganache is important if you want the rich chocolate-covered appearance shown here.
How do I make the chocolate coating look like the pictured cake?
Let the ganache cool before pouring. It should be thick enough to cling to the cake and form slow drips. Finish with vanilla cream swirls and irregular chocolate curls.
What is the best pan for this recipe?
A 10 × 15-inch jelly roll pan gives the batter the intended thickness. A significantly different pan changes both baking time and the final spiral.
Can I freeze the Swiss roll?
The undecorated sponge can be frozen if wrapped carefully. For the best cream and ganache texture, however, this fully assembled version is better enjoyed refrigerated rather than relying on freezing for routine storage.
Final Baking Notes
The impressive part of this cake is not complicated decoration. It is the spiral.
Give the eggs enough time to become thick and airy. Fold gently. Watch the oven closely. Then roll the sponge while it is still warm.
After that, patience does most of the work. Let the sponge cool before filling it. Chill the assembled roll before coating it. Let the ganache thicken before pouring. Pipe the vanilla cream only when the chocolate coating is cool enough to hold it.
Follow those details and your Chocolate Vanilla Swiss Roll will have the features that make this dessert so inviting: a tender golden sponge, a clear chocolate spiral, a rich outer coating, soft vanilla swirls, and scattered chocolate curls.
Most importantly, it will not only look beautiful when you make that first cut. It will taste like the homemade cake it is meant to be.