
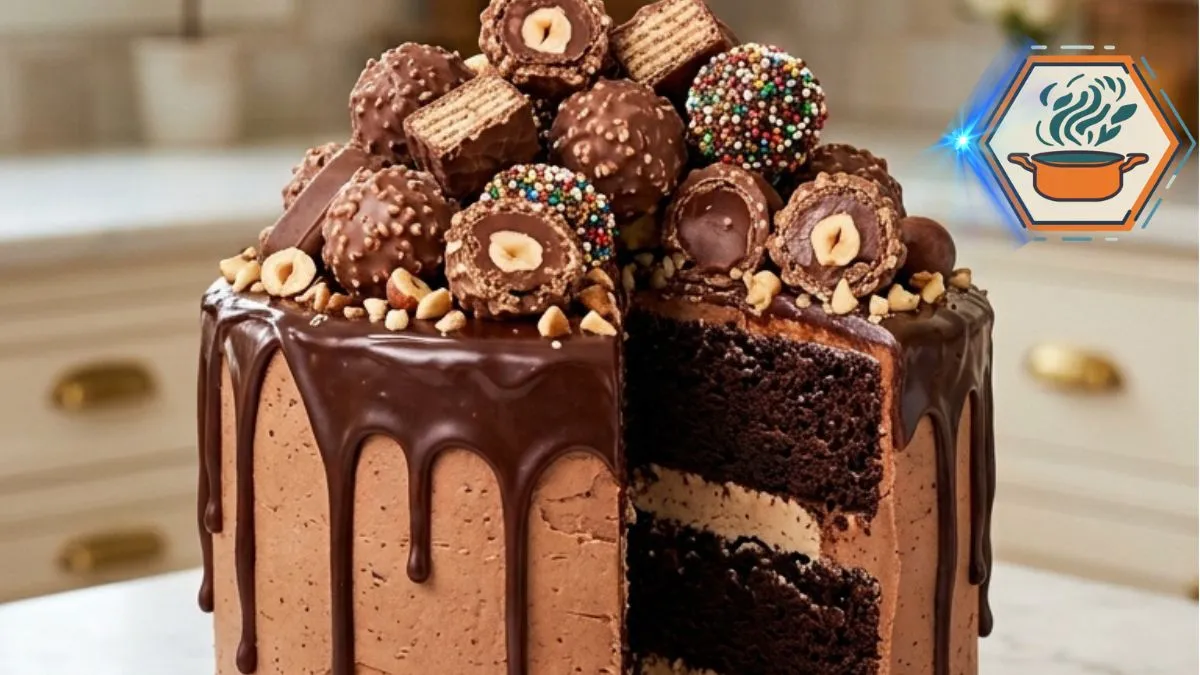
The first thing you notice about this Ultimate Chocolate Hazelnut Candy Cake is not the chocolate. It is the height. Three dark chocolate layers rise beneath creamy hazelnut filling, soft chocolate frosting, glossy ganache drips, and a generous crown of chocolate-hazelnut candies. Then you cut the first slice. The layers appear, the filling holds its shape, and every bite brings together soft cake, smooth cream, roasted hazelnut flavor, and a little wafer crunch.
This is the kind of cake made for birthdays, family celebrations, holidays, and those weekends when an ordinary chocolate cake simply will not do. It looks elaborate, but every part uses familiar baking methods. The secret is timing. Cool the cakes fully. Chill the filled cake. Add a thin crumb coat. Chill it again. Then apply ganache at the right temperature.
Chocolate and hazelnut are already a classic cake pairing. Even Ferrero Rocher’s official recipe collection pairs hazelnut cake with chocolate filling and hazelnut decoration. The method also stresses cooling the filling before assembly. That small detail matters when you are building a tall cake. Ferrero Rocher chocolate and hazelnut cake recipe
There is also one basic food-safety rule worth remembering. Flour is a raw food. The FDA advises against tasting uncooked cake batter because both raw flour and raw eggs can carry harmful bacteria. Bake the batter fully, and wash bowls, utensils, hands, and work surfaces after they contact raw batter. FDA guidance for handling flour safely
Affiliate disclosure: As an Amazon Associate I earn from qualifying purchases. This article may contain affiliate links to kitchen tools I find useful for preparing this recipe.
JUMP TO
Ultimate Chocolate Hazelnut Candy Cake
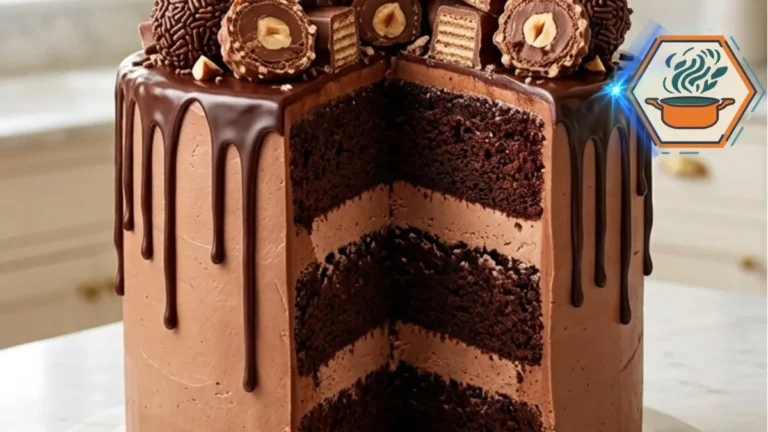
A tall, moist chocolate layer cake filled with silky chocolate-hazelnut cream, covered with fluffy chocolate frosting and finished with glossy chocolate ganache, hazelnut truffles, crunchy wafer pieces, and chocolate-hazelnut candies.
- Total Time: 3 hours 15 minutes
- Yield: 1 tall 8-inch three-layer cake, 16 servings
Ingredients
Chocolate Cake
- 2 cups (240 g) all-purpose flour
- 1 3/4 cups (350 g) granulated sugar
- 3/4 cup (70 g) unsweetened natural cocoa powder
- 2 teaspoons baking powder
- 1 1/2 teaspoons baking soda
- 1/2 teaspoon fine salt
- 2 large eggs, room temperature
- 1 cup (240 ml) whole milk, room temperature
- 1/2 cup (120 ml) neutral vegetable oil
- 2 teaspoons vanilla extract
- 1 cup (240 ml) hot coffee or hot water
Chocolate-Hazelnut Filling
- 8 oz (225 g) full-fat block cream cheese, softened but still cool
- 1 cup (about 300 g) chocolate-hazelnut spread
- 1 cup (240 ml) cold heavy whipping cream
- 1/3 cup (40 g) powdered sugar
Chocolate Frosting
- 1 cup (226 g) unsalted butter, softened
- 3 1/2 cups (420 g) powdered sugar
- 3/4 cup (70 g) unsweetened cocoa powder
- 1/3 cup (80 ml) heavy cream, plus more if needed
- 2 teaspoons vanilla extract
- 1/4 teaspoon fine salt
Chocolate Ganache
- 6 oz (170 g) semisweet chocolate, finely chopped
- 1/2 cup (120 ml) heavy cream
Chocolate-Hazelnut Topping
- 6–8 chocolate-hazelnut truffles
- 4–6 chocolate-covered wafer pieces
- 4–6 hazelnut-filled chocolate bites
- 3–5 chocolate sprinkle truffles
- Whole toasted hazelnuts, optional
Instructions
- Preheat the oven to 350°F (175°C). Grease three 8-inch round cake pans. Line the bottoms with parchment paper.
- Whisk the flour, sugar, cocoa powder, baking powder, baking soda, and salt in a large bowl.
- In another bowl, whisk the eggs, milk, oil, and vanilla. Add the wet mixture to the dry ingredients and mix just until combined.
- Slowly stir in the hot coffee. The batter will become thin. This is normal. Divide it evenly among the three prepared pans.
- Bake for 24–28 minutes, or until a toothpick inserted into the center comes out with a few moist crumbs and no wet batter.
- Cool in the pans for 10 minutes. Turn the cakes onto wire racks, remove the parchment, and cool completely. Chill the layers for 30–60 minutes before assembly for easier handling.
- Make the filling. Beat the cream cheese until smooth. Beat in the chocolate-hazelnut spread. In a separate cold bowl, whip the heavy cream and powdered sugar to medium-stiff peaks. Gently fold the whipped cream into the hazelnut mixture. Chill for 15–20 minutes if it feels too soft.
- Make the frosting. Beat the butter until creamy. Gradually add the powdered sugar and cocoa. Add the heavy cream, vanilla, and salt. Beat until light and spreadable.
- Level the cold cake layers if necessary. Put the first layer on a cake board. Pipe a ring of chocolate frosting around its edge to create a filling dam. Spread an even 1/3- to 1/2-inch layer of hazelnut filling inside.
- Add the second cake layer and repeat. Add the third layer. Chill the stacked cake for 30 minutes.
- Apply a thin crumb coat of chocolate frosting. Refrigerate for 20–30 minutes. Cover with the remaining frosting, leaving subtle spatula texture on the sides.
- Refrigerate the frosted cake while making the ganache. Place the chopped chocolate in a heatproof bowl. Heat the cream until steaming, then pour it over the chocolate. Leave for 2 minutes and stir until glossy.
- Let the ganache cool for about 10–20 minutes. Test one drip on the cold cake. It should move slowly without reaching the bottom immediately.
- Create irregular ganache drips around the edge. Spread the remaining ganache over the top.
- Arrange chocolate-hazelnut truffles, wafer pieces, hazelnut-filled chocolates, and sprinkle truffles on top. Cut several candies in half so their wafer and hazelnut centers remain visible.
- Chill until stable. For the best texture, let individual slices stand at room temperature for about 15–25 minutes before serving.
Notes
- Do not add extra flour when the finished batter looks thin.
- Weigh the batter between the three pans for layers of similar thickness.
- The cake layers must be completely cold before filling.
- Use full-fat block cream cheese, not spreadable cream cheese from a tub.
- A frosting dam is important because the whipped hazelnut filling is softer than buttercream.
- Chill the cake before applying ganache.
- Always test one ganache drip first.
- Cut several candies in half to reproduce the visible wafer and hazelnut centers.
- Keep the finished cake refrigerated because the filling contains cream cheese and whipped cream.
- The exact topping quantity can be adjusted according to candy size.
- Prep Time: 1 hour 15 minutes
- Chilling/Additional Time: 1 hour 30 minutes
- Cook Time: 24–28 minutes
- Category: Dessert
- Method: Baking
- Cuisine: American-inspired
Why This Chocolate Hazelnut Cake Works
A tall layer cake needs more than good flavor. It needs structure.
The chocolate sponge must stay moist without becoming so fragile that it collapses under the filling. The hazelnut cream must remain soft but stable. The outer frosting has to support the ganache. Finally, the ganache must be fluid enough to drip without running to the cake board.
This version balances all four.
Hot coffee deepens the cocoa flavor. It does not make the finished cake taste strongly of coffee. Vegetable oil keeps the crumb soft, including after refrigeration.
The filling combines cream cheese, chocolate-hazelnut spread, and whipped cream. The cream cheese provides body. Whipped cream keeps the filling lighter than straight chocolate-hazelnut spread.
The decoration matters too. Whole candies alone can look heavy. Cutting several chocolate-hazelnut and wafer pieces in half reveals their different centers. That creates the layered, abundant appearance that makes this cake stand out.
If you enjoy working with filled chocolate desserts, our strawberry filled chocolate cake guide is another useful idea for your baking list.
Ingredients
This recipe makes one tall three-layer 8-inch cake, about 12 to 16 servings depending on slice size.
For the Chocolate Cake
- 2 cups (240 g) all-purpose flour
- 1 3/4 cups (350 g) granulated sugar
- 3/4 cup (65–75 g) unsweetened cocoa powder
- 2 teaspoons baking powder
- 1 1/2 teaspoons baking soda
- 1/2 teaspoon fine salt
- 2 large eggs, at room temperature
- 1 cup (240 ml) whole milk, at room temperature
- 1/2 cup (120 ml) neutral vegetable oil
- 2 teaspoons vanilla extract
- 1 cup (240 ml) hot coffee or hot water
Use natural unsweetened cocoa unless your cocoa package or recipe adjustments specifically account for Dutch-process cocoa. The baking soda in this formula works well with the acidity present in natural cocoa.
For the Chocolate-Hazelnut Filling
- 8 oz (225 g) full-fat block cream cheese, softened but still cool
- 1 cup (about 300 g) chocolate-hazelnut spread
- 1 cup (240 ml) cold heavy whipping cream
- 1/3 cup (40 g) powdered sugar
Use block-style cream cheese rather than a soft spread from a tub. The firmer texture helps the filling support three cake layers.
For the Chocolate Frosting
- 1 cup (226 g) unsalted butter, softened
- 3 1/2 cups (420 g) powdered sugar
- 3/4 cup (65–75 g) unsweetened cocoa powder
- 1/3 cup (80 ml) heavy cream, plus a little more if needed
- 2 teaspoons vanilla extract
- 1/4 teaspoon fine salt
For the Chocolate Ganache
- 6 oz (170 g) semisweet chocolate, finely chopped
- 1/2 cup (120 ml) heavy cream
Use real chocolate bars when possible rather than chocolate chips. Chopped chocolate generally melts more evenly and gives the ganache a smooth finish.
For the Candy Topping
Use approximately 12 to 18 pieces in total, depending on their size:
- Chocolate-hazelnut truffles
- Chocolate-covered wafer pieces
- Hazelnut-filled chocolate bites
- Chocolate sprinkle truffles
- Whole toasted hazelnuts, optional
- Chopped toasted hazelnuts, optional
You do not need one specific candy brand. A mixture of shapes and textures creates the best finish.
Equipment You Will Need
Gather everything before mixing the batter:
- Three 8-inch round cake pans
- Parchment paper
- Large mixing bowls
- Whisk
- Electric hand mixer or stand mixer
- Rubber spatula
- Cooling racks
- Offset spatula
- Cake board or flat serving plate
- Small saucepan
- Serrated knife or cake leveler
- Kitchen scale, preferably
A digital kitchen scale is especially helpful for this recipe. Weighing the batter between the pans makes it much easier to create three layers of similar thickness. They will also tend to bake at a similar rate.
If you do not already own matching pans, a set of three 8-inch round cake pans is particularly convenient here because you can bake all three layers at the same time.
How to Make the Chocolate Cake Layers
Preheat the oven to 350°F (175°C). Give the oven enough time to reach temperature before the pans go inside.
Grease three 8-inch pans lightly. Place a circle of parchment paper in the bottom of each pan. Grease the parchment lightly as well.
In a large bowl, whisk together the flour, sugar, cocoa powder, baking powder, baking soda, and salt. Break up any visible cocoa lumps.
In another bowl, whisk the eggs, milk, vegetable oil, and vanilla.
Pour the wet mixture into the dry ingredients. Mix only until most dry streaks disappear.
Now slowly add the hot coffee while whisking on low speed or stirring by hand.
Do not panic when the batter becomes thin. That is expected. Do not add extra flour to thicken it.
Divide the batter evenly between the prepared pans. If you have a scale, weigh the filled pans so each receives approximately the same amount.
Bake for 24 to 28 minutes.
Start checking at 24 minutes. A toothpick inserted near the center should come out with a few moist crumbs rather than liquid batter. The center should also spring back gently when touched.
Avoid opening the oven repeatedly during the first 20 minutes. A sudden drop in heat can interfere with the cake’s rise.
Let the cakes rest in their pans for about 10 minutes. Run a thin knife around the edges if necessary. Turn them onto cooling racks, remove the parchment, and allow them to cool completely.
Never frost warm cake.
For easier assembly, wrap the cooled layers and refrigerate them for 30 to 60 minutes. Cold cake is firmer and produces fewer crumbs.
Make the Chocolate-Hazelnut Filling
Place the softened cream cheese in a bowl and beat briefly until smooth.
Add the chocolate-hazelnut spread. Beat until the color is even and no streaks of cream cheese remain.
In a separate cold bowl, pour in the cold heavy cream. Add the powdered sugar.
Whip until medium to stiff peaks form. Stop before the cream becomes grainy.
Fold about one-third of the whipped cream into the hazelnut mixture to loosen it. Fold in the rest gently.
Do not beat aggressively at this stage. Folding preserves the air in the whipped cream.
The finished filling should be creamy but thick enough to stay on a spatula.
If your kitchen is warm or the filling feels too soft, refrigerate it for 15 to 20 minutes before assembling the cake.
Make the Chocolate Frosting
Beat the softened butter for about 2 to 3 minutes until creamy.
Sift the powdered sugar and cocoa powder if either contains lumps.
Add them gradually to the butter while mixing on low speed. Add the vanilla, salt, and most of the cream.
Once the dry ingredients are incorporated, increase to medium speed and beat until fluffy.
Check the consistency.
The frosting should spread without tearing the cake, but it should not slide from the spatula. Add heavy cream one teaspoon at a time if it is too stiff. If it becomes too soft, chill it briefly.
For more general cake ideas and dessert inspiration, visit the RecipesMind home page.
Level the Cake Before Stacking
A tall cake is much easier to assemble when the layers are flat.
If your cakes developed domed tops, use a long serrated knife to remove only the raised portion. Work slowly rather than sawing aggressively through one side.
A rotating cake turntable can make leveling, filling and frosting a tall cake easier because you can turn the cake while keeping your hand and spatula in a comfortable position.
Brush away loose crumbs.
Place the first cake layer on a cake board or serving plate.
Assemble the Layers
Spread a small dab of frosting beneath the first layer. This acts like glue and keeps the cake from moving.
One detail makes this cake much safer to stack: create a frosting dam.
Pipe or spread a thick ring of chocolate frosting around the outer edge of the first cake layer. Spoon the chocolate-hazelnut filling inside that ring.
Keep the filling approximately 1/3 to 1/2 inch thick.
The frosting border helps prevent the softer filling from squeezing out when the next layer is added.
Place the second cake layer on top. Press very gently.
Repeat the frosting dam and hazelnut filling.
Add the final chocolate layer with its flattest side facing upward.
Check the cake from several angles. Correct any leaning now rather than after frosting.
Refrigerate the stacked cake for 30 minutes.
The Crumb Coat Is Worth the Extra Step
A crumb coat is a very thin first layer of frosting.
Spread a small amount of chocolate frosting over the top and sides. It does not need to look beautiful. Its job is to trap loose chocolate crumbs.
Chill the cake for another 20 to 30 minutes, or until the crumb coat feels firm.
Now apply the remaining frosting.
For the homemade finish shown in this style of cake, you do not need perfectly polished sides. Use an offset spatula to create gentle strokes while keeping the overall cake straight.
That slight texture works particularly well beneath glossy ganache.
How to Make Thick Chocolate Ganache Drips
Finely chop the semisweet chocolate and place it in a heatproof bowl.
Heat the heavy cream until it is steaming and just beginning to show tiny bubbles around the edge. Do not let it boil aggressively.
Pour the hot cream over the chocolate.
Leave it untouched for 2 minutes.
Then stir slowly from the center outward until smooth and glossy.
Now comes the step many recipes rush: wait.
Hot ganache poured onto a cake will race down the sides. You want controlled, thick drips.
Allow the ganache to cool for approximately 10 to 20 minutes, depending on your room temperature. Meanwhile, keep the frosted cake cold.
Test one drip on the back of the cake.
If it runs immediately to the bottom, the ganache is still too warm. Wait several minutes and test again.
If it barely moves, warm it for a few seconds.
Once the consistency is right, spoon small amounts around the top edge to form individual drips. Then spread the remaining ganache across the center.
If you want to become more comfortable working with sugar-based dessert finishes too, see our guide to mastering caramelized sugar.
Create the Chocolate-Hazelnut Candy Crown
Wait until the ganache has begun to settle but has not become completely hard.
Start with the largest chocolate-hazelnut truffles.
Place them toward the center and rear of the cake rather than arranging everything in a flat circle.
Then add wafer pieces at different angles.
Cut several truffles and wafer candies in half with a sharp knife. Place the cut surfaces facing outward. This reveals the hazelnut centers, cream, and wafer layers.
Fill smaller gaps with chocolate sprinkle truffles, hazelnut bites, and toasted hazelnuts.
The goal is controlled abundance.
Avoid covering every inch of ganache. Small visible areas of glossy chocolate create contrast between the frosting, drips, and candy topping.
How to Get the Same Dramatic Look
Three visual details make the biggest difference.
First, build height in the center. Do not spread all the candies evenly across the surface.
Second, show the inside of several candies. Whole chocolates give shape. Cut chocolates provide texture.
Third, keep the ganache drips irregular. Some should be short. Others can travel farther down the side. Perfectly identical drips tend to look less natural.
The cake should have:
- Tall, clearly visible chocolate layers
- Thick chocolate-hazelnut filling
- Milk-chocolate-colored outer frosting
- Dark, glossy ganache
- Defined drips
- A dense candy crown
- Visible wafer and hazelnut centers
How to Cut Clean Slices
A tall chilled cake can drag frosting through every layer if you use a cold, dirty knife.
Fill a tall container with hot water.
Dip a long sharp knife into the water, wipe it completely dry, and make one cut.
Clean and warm the knife again before the next cut.
For the best eating texture, let individual slices sit at room temperature for about 15 to 25 minutes before serving. The frosting and filling become softer and the chocolate flavor becomes more pronounced.
Make-Ahead Instructions
You do not need to make the entire cake in one afternoon.
The cake layers can be baked a day ahead. Cool them completely, wrap each layer well, and refrigerate.
You can also prepare the frosting ahead and refrigerate it in a covered container. Bring it toward room temperature and beat it briefly before using.
For the neatest result, assemble and frost the cake one day before serving. Add the ganache after the frosting is thoroughly chilled.
The candy decoration can be added last so wafer-based pieces retain more of their crunch.
Storage
Because the filling contains cream cheese and whipped cream, keep the assembled cake refrigerated.
Cover cut surfaces to keep them from drying out.
For the best texture and appearance, enjoy the cake within about 3 to 4 days.
Do not leave the finished cake sitting in a warm room for extended periods. USDA food-safety guidance notes that perishable foods should not remain between 40°F and 140°F for more than two hours.
Common Mistakes to Avoid
Filling a Warm Cake
Even slightly warm layers can soften the filling and frosting. Wait until every layer is completely cool.
Skipping the Filling Dam
Whipped hazelnut filling is softer than buttercream. A frosting border helps keep it inside the cake.
Adding Ganache to a Room-Temperature Cake
Cold frosting helps stop the ganache and creates thicker, more defined drips.
Pouring Ganache While It Is Hot
This is one of the fastest ways to lose the intended look. Test a single drip first.
Adding More Flour Because the Batter Looks Thin
Do not. This chocolate batter is supposed to be fluid after the hot coffee is added. Extra flour can produce a dry, heavy cake.
Overmixing the Batter
Once flour meets liquid, mix only as much as needed. Excess mixing can make the crumb tougher.
Using Only Whole Candies
Cut some chocolates and wafers open. Those visible centers are a major part of the cake’s visual appeal.
Making the Filling Too Thick
A huge layer of filling may look tempting, but it makes a tall cake unstable. Keep each filling layer controlled and even.
Frequently Asked Questions
What does coffee do in chocolate cake?
Coffee intensifies the roasted notes of cocoa and makes the chocolate flavor seem deeper. In this quantity, the cake should still taste primarily of chocolate. Hot water can be used instead if you prefer.
Can I make this cake without coffee?
Yes. Replace the coffee with the same amount of hot water.
Can I make the cake with two pans?
Yes, but do not overload shallow pans. You may need to bake in batches or adjust the pan size and baking time. Three 8-inch layers give this cake its tall celebration-cake appearance.
Why did my ganache run down the entire cake?
It was probably too warm, the cake was not cold enough, or both. Cool the ganache until slightly thickened and test one drip before decorating the entire edge.
Why is my chocolate-hazelnut filling soft?
The cream may have been under-whipped, the cream cheese may have been too warm, or the room may be hot. Chill the filling for 15 to 20 minutes. Full-fat block cream cheese also gives better structure than soft tub-style cream cheese.
Can I use chocolate chips for the ganache?
You can, but finely chopped semisweet baking chocolate is a better choice for a smooth ganache because some chips contain ingredients designed to help them retain their shape.
Do I need to toast the hazelnuts?
It is optional, but toasted hazelnuts add a stronger nutty aroma and extra crunch. Let them cool completely before putting them on the cake.
Can I freeze the chocolate cake layers?
Yes. Cool the unfrosted layers completely, wrap them tightly, and freeze them. Thaw while wrapped so condensation forms mainly on the wrapping rather than directly on the cake.
How far ahead can I make this cake?
Bake the layers ahead and assemble the cake the day before your celebration. Keep it refrigerated because the filling contains dairy. Add crunchy wafer decorations close to serving time when possible.
How do I stop a tall layer cake from leaning?
Start with level, cold cake layers. Keep the filling even and avoid using too much. Pipe a frosting dam around each filling layer. Check alignment as you stack, then chill the assembled cake before applying the final frosting.
Final Baking Notes
The Ultimate Chocolate Hazelnut Candy Cake looks extravagant because several simple textures are stacked together: moist chocolate sponge, airy hazelnut cream, fluffy cocoa frosting, glossy ganache, crisp wafers, and whole hazelnuts.
The most important ingredient is patience between stages.
Cool the cake before filling it. Chill it after stacking. Apply a crumb coat. Chill again. Test the ganache before creating all the drips. Finally, arrange the chocolates rather than simply dropping them on top.
When the knife reaches the center, you should see three dark cake layers separated by thick bands of chocolate-hazelnut cream. Above them sits the glossy chocolate drip and a crown of candies with exposed wafer and hazelnut centers.
That first cut is when all those small steps become worth it.