
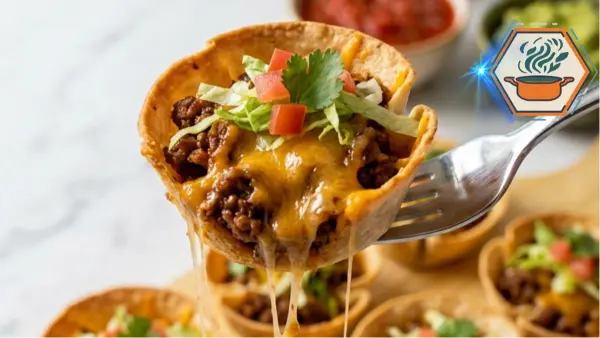
Some nights call for a recipe that barely feels like cooking. You open the refrigerator, spot leftover taco meat, and want something more exciting than another regular taco. That is exactly where these Two-Ingredient Taco Cups come in. They turn two familiar foods into small, crunchy taco bites that can go from kitchen to table in minutes.
The basic idea could hardly be simpler. Take sturdy scoop-shaped tortilla chips, fill them with warm seasoned taco meat, then bake them briefly. The result has the contrast that makes tacos so satisfying: a crisp corn shell around a hot, savory center. For food-safety guidance when preparing ground beef from raw, the USDA Food Safety and Inspection Service recommends cooking ground beef to an internal temperature of 160°F (71.1°C).
Taco cups also fit naturally into the wider world of bite-size taco recipes. Variations use tortilla chips, tortillas, or wonton wrappers as edible cups. The chip version has one major advantage: there is no shell to cut, shape, or prebake. If you enjoy simple dinner ideas, you can also browse more inspiration on RecipesMind.
The trick, however, is in the details. A thin chip can crack. Wet meat can make the bottom soft. Too much filling can cause the cup to collapse. And leaving the cups in the oven for too long can take them from crunchy to overly browned.
This recipe explains those small details so your taco cups are easy to reproduce at home.
jump to
Two-Ingredient Taco Cups
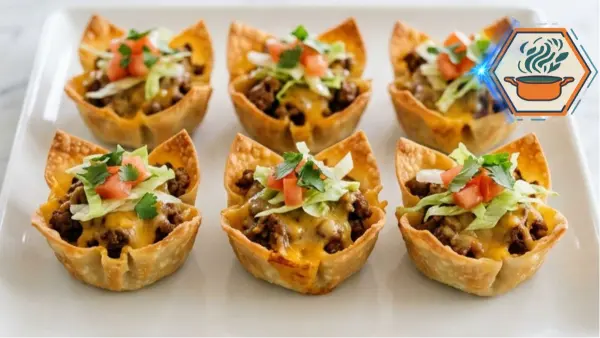
These Two-Ingredient Taco Cups combine crispy scoop-style tortilla chips with savory seasoned taco meat for an easy bite-size dinner or party appetizer. Add shredded cheddar for the rich, melted finish shown in the photos, then finish with lettuce, tomatoes, salsa, sour cream, guacamole, or cilantro.
- Total Time: 18 minutes
- Yield: 24 taco cups
Ingredients
Main Ingredients
2 cups cooked seasoned taco meat, warm and well drained
24 sturdy scoop-style tortilla chips, plus a few extra in case some are broken
Recommended for the Cheesy Version
1/2 cup finely shredded cheddar cheese
1 teaspoon taco seasoning, only if the cooked meat needs more seasoning
Optional Toppings
Sour cream
Salsa
Guacamole
Finely diced tomatoes, drained of excess liquid
Finely shredded lettuce
Thinly sliced jalapeños
Chopped fresh cilantro
Sliced black olives
Extra shredded cheddar cheese
Instructions
1. Preheat the oven to 375°F (190°C).
2. Set a standard 12-cup muffin pan on your work surface. Heavy greasing is not necessary. A very light coating of cooking spray may be used if desired.
3. Check the cooked taco meat before assembling the cups. Drain away excess grease or cooking liquid. Wet filling can soften the tortilla chips.
4. If the taco meat is cold, warm it briefly before assembly. The meat should already be fully cooked. If preparing ground beef from raw, cook it to an internal temperature of 160°F (71°C).
5. Place one intact, sturdy scoop-style tortilla chip upright inside each muffin cup. Avoid cracked or very thin chips.
6. Add about 1 to 1 1/2 tablespoons of taco meat to each tortilla scoop. Do not press the filling firmly into the chip and do not overfill.
7. If using the cheesy version, sprinkle a small amount of finely shredded cheddar over each filled taco cup. Add extra taco seasoning only if needed.
8. Bake for 6 to 8 minutes, or until the filling is hot and the cheddar is fully melted. Begin checking at 6 minutes because tortilla chips can brown quickly.
9. Remove the pan from the oven and let the taco cups rest for about 1 minute.
10. Carefully transfer the taco cups to a serving platter.
11. Add sour cream, salsa, guacamole, diced tomatoes, shredded lettuce, jalapeños, cilantro, black olives, or additional cheddar only after baking.
12. Serve immediately while the shells are warm and crisp.
13. Repeat with the remaining tortilla scoops and filling if using a 12-cup muffin pan.
Notes
1. Preheat the oven to 375°F (190°C).
2. Set a standard 12-cup muffin pan on your work surface. Heavy greasing is not necessary. A very light coating of cooking spray may be used if desired.
3. Check the cooked taco meat before assembling the cups. Drain away excess grease or cooking liquid. Wet filling can soften the tortilla chips.
4. If the taco meat is cold, warm it briefly before assembly. The meat should already be fully cooked. If preparing ground beef from raw, cook it to an internal temperature of 160°F (71°C).
5. Place one intact, sturdy scoop-style tortilla chip upright inside each muffin cup. Avoid cracked or very thin chips.
6. Add about 1 to 1 1/2 tablespoons of taco meat to each tortilla scoop. Do not press the filling firmly into the chip and do not overfill.
7. If using the cheesy version, sprinkle a small amount of finely shredded cheddar over each filled taco cup. Add extra taco seasoning only if needed.
8. Bake for 6 to 8 minutes, or until the filling is hot and the cheddar is fully melted. Begin checking at 6 minutes because tortilla chips can brown quickly.
9. Remove the pan from the oven and let the taco cups rest for about 1 minute.
10. Carefully transfer the taco cups to a serving platter.
11. Add sour cream, salsa, guacamole, diced tomatoes, shredded lettuce, jalapeños, cilantro, black olives, or additional cheddar only after baking.
12. Serve immediately while the shells are warm and crisp.
13. Repeat with the remaining tortilla scoops and filling if using a 12-cup muffin pan.
- Prep Time: 10 minutes
- Cook Time: 8 minutes
- Category: Dinner
- Method: Baking
- Cuisine: Tex-Mex
Why You’ll Love These Two-Ingredient Taco Cups
The appeal starts with simplicity.
At their most basic, you need only:
- Seasoned cooked taco meat
- Sturdy scoop-style tortilla chips
That makes this recipe useful when you have leftover taco filling after Taco Tuesday.
It is also flexible. Serve several cups as part of dinner, or make a tray for a party. Put bowls of toppings on the table and everyone can finish their own.
These little cups work especially well for:
- Quick weeknight dinners
- Taco Tuesday
- Game-day food
- Party appetizers
- Potlucks
- Movie nights
- Family gatherings
- After-school snacks
Best of all, there is very little preparation once the taco meat is cooked.
Ingredients You’ll Need
The Two Main Ingredients
2 cups cooked seasoned taco meat
Ground beef is the classic choice. The meat should already be fully cooked and seasoned before it goes into the tortilla cups.
If you’re starting with raw ground beef, cook it completely first. USDA guidance specifies 160°F (71.1°C) as the safe minimum internal temperature for ground beef. Do not rely only on its color to determine doneness.
2 cups sturdy scoop-style tortilla chips
Choose chips specifically shaped like little bowls or scoops.
Avoid very thin chips. They are more likely to crack under the weight of the filling.
Recommended Additions
Although this is designed as a two-ingredient recipe, two small additions make the finished cups more flavorful:
- 1 teaspoon taco seasoning
- 2 tablespoons shredded cheddar cheese
The cheese also creates the stretchy, melted finish shown in this recipe’s presentation.
If your taco meat is already strongly seasoned, taste it before adding more taco seasoning.
Optional Taco Cup Toppings
This is where a simple recipe can become a colorful taco platter.
Try:
- Sour cream
- Salsa
- Guacamole
- Diced tomatoes
- Finely shredded lettuce
- Sliced jalapeños
- Chopped cilantro
- Sliced black olives
- Extra shredded cheddar
- Diced avocado
Keep cold and watery toppings off the cups until after baking.
This matters more than it may seem. Tomatoes, salsa, and similar toppings release moisture. Adding them before baking can soften the tortilla chips.
Choosing the Right Chips Is Important
The tortilla chip acts as the entire structure of each taco cup.
Look for deep, sturdy scoop-style corn tortilla chips with intact edges.
When opening the bag, sort through the chips before filling them. Save cracked pieces for nachos or dipping.
A good cup should sit reasonably upright and have enough room for approximately a spoonful of filling.
Do not force an oversized chip into a muffin cavity. The muffin pan is mainly there to support the cups while they warm.
If you’re interested in another easy Tex-Mex meal, see this guide to a Beefy 5-Layer Burrito.
How to Make Two-Ingredient Taco Cups
1. Preheat the Oven
Preheat your oven to 375°F (190°C).
Allow it to heat fully before putting the cups inside.
A short bake in an already-hot oven warms the filling without forcing the tortilla chips to spend unnecessary time in the heat.
2. Prepare the Muffin Pan
Use a standard 12-cup muffin pan.
A very light coating of cooking spray can help with cleanup, although the chips themselves generally contain enough fat that heavy greasing is unnecessary.
Set one sturdy tortilla scoop into each muffin cavity.
The pan supports the chips and helps prevent them from tipping when filled.
3. Check Your Taco Meat
The meat should be fully cooked before assembly.
If it has been refrigerated, you can take the chill off it before filling the chips. This reduces the amount of oven time needed.
More importantly, make sure the filling isn’t watery.
If liquid has collected in the pan, drain it first.
This is one of the most important details for crisp taco cups.
Excess liquid quickly travels into the corn chip and softens it.
4. Fill the Cups
Spoon the taco meat into each tortilla scoop.
Do not pack the filling down heavily.
Aim for a full cup without creating a large mound above the edges.
Overfilling makes the chips difficult to pick up and increases the chance of breakage.
5. Add Cheese
For the richer version pictured, scatter a small amount of shredded cheddar over each cup.
You only need enough to lightly cover the meat.
Freshly shredded cheddar usually melts particularly well because it has not been coated with the same anti-caking ingredients commonly used on some pre-shredded cheeses.
6. Bake
Bake the taco cups for approximately 8–10 minutes.
Because the filling is already cooked, this stage is mainly about heating the meat and melting the cheese.
Watch the tortilla edges closely during the final few minutes.
You want warm, crunchy cups rather than dark, brittle chips.
7. Add Fresh Toppings
Remove the pan from the oven.
Let the cups sit for about 1–2 minutes. This makes them easier to handle while keeping them warm.
Carefully transfer them to a serving plate.
Now add lettuce, tomato, sour cream, guacamole, salsa, cilantro, jalapeños, or olives.
Serve immediately.
The Secret to Crispy Taco Cups
There isn’t one unusual secret ingredient. Texture comes from controlling moisture, structure, and baking time.
Start with sturdy tortilla scoops.
Then keep the filling relatively dry.
Finally, bake only long enough to heat everything.
For the best crunch:
- Drain excess grease or liquid from the cooked meat.
- Don’t add salsa before baking.
- Don’t add tomatoes before baking.
- Use intact, thick tortilla scoops.
- Don’t overload each chip.
- Start with a fully preheated oven.
- Add lettuce and other cold toppings after baking.
- Serve the cups right away.
The last point is particularly important.
Once moist taco filling sits against a tortilla chip, the chip will gradually absorb moisture. No storage technique can keep an assembled cup as crisp as a freshly made one.
How Much Meat Goes Into Each Cup?
Use roughly 1 tablespoon, depending on the size of your tortilla scoops.
The goal is balance.
Too little filling makes them feel like dressed-up chips. Too much makes them difficult to eat.
A bite should include crunchy tortilla, seasoned meat, melted cheese, and whatever topping you choose.
Taco Meat Tips
If you’re making the filling from scratch, brown your ground beef in a skillet and break it into small crumbles.
Small pieces work much better here than large chunks.
Drain excessive fat when needed, then season the meat.
Remember that taco seasoning blends vary widely in salt and spice. Start conservatively if you’re adding extra seasoning to meat that has already been prepared.
For another comforting ground-beef dinner, try our Taco Potato Casserole.
Toppings That Work Best
A great topping adds flavor without making the chip difficult to eat.
For freshness: finely shredded lettuce, diced tomato, cilantro, or avocado.
For creaminess: sour cream or guacamole.
For heat: sliced jalapeños or your preferred spicy salsa.
For more cheese: add a pinch of cheddar immediately after the cups leave the oven.
You can also make a taco-cup bar. Bake one large batch, then put toppings into separate bowls.
Guests can choose what they like.
Easy Variations
Once you understand the basic method, the filling can change.
Chicken Taco Cups
Use finely shredded cooked chicken seasoned with taco spices.
If using chicken prepared from raw, follow appropriate safe cooking temperatures; USDA guidance lists 165°F (73.9°C) for poultry.
Bean Taco Cups
Use seasoned black beans or refried beans for a meatless version.
Keep the filling fairly thick so it doesn’t soak the chips.
Extra-Cheesy Taco Cups
Place a tiny pinch of cheddar in the bottom, followed by meat and another little layer of cheese.
Don’t add so much cheese that oil collects inside the cup.
Spicy Taco Cups
Add finely chopped jalapeño after baking or use a hotter taco seasoning in the meat.
Loaded Taco Cups
Top each baked cup with small amounts of lettuce, tomato, sour cream, guacamole, cilantro, and olives.
The key word is small. These are mini taco cups, so finely chopped toppings stay in place better.
What to Serve With Taco Cups
For dinner, pair the cups with simple sides such as:
- Mexican-style rice
- Black beans
- Corn salad
- Green salad
- Fresh tomato salsa
- Guacamole
- Roasted vegetables
If your family likes burrito-inspired meals, our Grilled Cheese Burrito guide is another option to save for your next Tex-Mex dinner.
Common Taco Cup Mistakes
Using Thin Chips
Thin tortilla chips can split as soon as you add the meat.
Fix: Choose deep, sturdy scoop-style chips and discard cracked ones before assembly.
Filling Them With Wet Meat
This is probably the fastest route to soggy cups.
Fix: Drain excess cooking liquid or grease before assembly.
Adding Salsa Before Baking
Salsa adds a lot of moisture.
Fix: Spoon it onto the finished cups immediately before eating, or serve it on the side.
Overfilling the Cups
A giant pile of meat may look generous, but it makes the cup unstable.
Fix: Use a modest spoonful and leave enough exposed chip to pick it up.
Baking Too Long
The taco meat is already cooked. It doesn’t need another full cooking cycle.
Fix: Remove the cups when the filling is hot and the cheese has melted.
Preparing Them Too Early
This recipe isn’t ideal for fully assembling hours ahead.
Fix: Prepare the meat and toppings separately. Assemble and bake shortly before serving.
Storage and Reheating
There is an important difference between food safety and food texture.
USDA guidance says cooked leftovers can generally be refrigerated for 3–4 days, provided they are handled and chilled properly. Leftovers should be refrigerated promptly rather than left at room temperature for extended periods.
But that doesn’t mean assembled taco cups will stay crunchy for four days.
They won’t.
For this particular recipe, store the components separately whenever possible.
Put leftover taco meat in an airtight container in the refrigerator. Keep unused tortilla scoops sealed at room temperature according to their package directions. Refrigerate perishable toppings separately.
Then build fresh cups when you’re ready to eat.
If you already assembled the cups, refrigerate leftovers promptly. Expect the tortilla shells to soften.
For the best eating experience, these are made and eaten fresh.
Make-Ahead Instructions
Want these for a party?
Prepare the components rather than the finished cups.
Earlier in the day you can:
- Cook and season the meat.
- Shred the cheese.
- Wash and dry the lettuce.
- Dice toppings and refrigerate them.
- Prepare guacamole or salsa.
- Sort intact tortilla scoops from the bag.
Shortly before serving, warm the meat if needed, fill the cups, add cheese, and bake.
Add cold toppings at the last moment.
That gives you much of the convenience of advance preparation without sacrificing the crunch.
Two-Ingredient Taco Cups FAQs
What are taco cups made of?
This version uses two core ingredients: seasoned cooked taco meat and sturdy scoop-style tortilla chips. Cheese and taco seasoning are recommended additions, while toppings are optional.
How do you keep taco cups from getting soggy?
Keep excess moisture away from the tortilla chips. Drain the meat well, avoid wet toppings before baking, and assemble the cups shortly before they go into the oven. Serve immediately for the best crunch.
Can I make taco cups ahead of time?
Prepare the filling and toppings ahead, but don’t assemble everything too early. The meat’s moisture gradually softens tortilla chips.
Do I have to use a muffin pan?
A muffin pan is helpful because it supports the scoop-shaped chips and keeps them upright while they bake. If your chips stand securely on their own, a rimmed baking sheet may also work, but the muffin pan provides better stability.
Can I use regular tortilla chips?
Regular flat tortilla chips don’t create a cup that can hold the meat. Deep scoop-style chips are the most practical choice for this particular recipe.
Can I use ground turkey instead of beef?
Yes. Seasoned ground turkey can work as the filling. If preparing raw ground poultry, cook it to the USDA-recommended minimum internal temperature of 165°F (73.9°C).
Why did my taco cups become soft?
Moisture is usually responsible. The filling may have contained excess liquid, wet toppings may have been added too early, or the assembled cups may have sat too long before serving.
What temperature should taco cups be baked at?
For this recipe, bake them at 375°F (190°C) for about 8–10 minutes, since the taco meat is already cooked. Watch the chip edges and remove the cups once the filling is hot and the cheese has melted.
Are taco cups good for parties?
Yes. Their small size makes them convenient as finger food. Prepare all the components beforehand and bake the cups shortly before guests are ready to eat.
Final Tips for Taco Cups That Actually Work
Two-Ingredient Taco Cups prove that a short ingredient list doesn’t have to mean a boring dinner.
But simplicity makes technique even more important.
Use sturdy tortilla scoops. Start with fully cooked, well-drained taco meat. Don’t bury the cups under too much filling. Keep salsa and other wet ingredients for the end. Bake briefly, then serve while everything is hot and crunchy.
If you want the richer version shown here, add a little cheddar before baking. The melted cheese binds the filling slightly and gives each cup that warm, cheesy finish.
And perhaps the best part is what happens when the tray reaches the table. Instead of building individual tacos, everyone simply picks up a little cup and adds their favorite toppings.
Two basic ingredients become something playful, practical, and satisfying.
That’s exactly the kind of recipe worth keeping around for the next busy Taco Tuesday.