
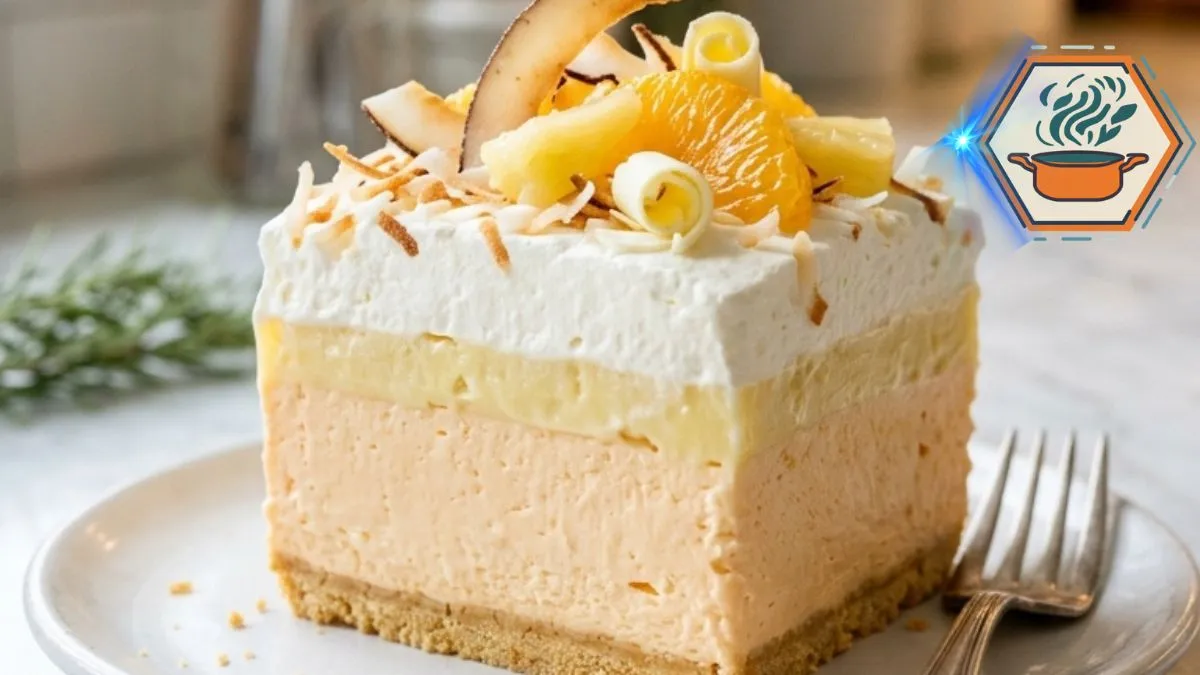
There is something special about opening the refrigerator on a warm afternoon and finding a cold, creamy dessert waiting inside. This Orange Pineapple Creamsicle Lush brings together bright orange, sweet pineapple, vanilla, cream cheese, and a buttery cookie crust. The result is a layered no-bake dessert with the nostalgic flavor of an orange creamsicle and a tropical pineapple finish.
A lush dessert is built around contrast. You want a crust that can support a square when it is lifted from the pan. Above it, the filling should be soft and creamy without running into the lower layer. Similar chilled desserts are often called lush, dream desserts, dessert lasagna, or icebox-style desserts. They commonly combine a crumb crust with creamy fillings and whipped topping. For more home-cooking inspiration, you can also browse the RecipesMind recipe collection.
The most important part of this recipe is not decoration. It is moisture control. Pineapple must be thoroughly drained, the cream cheese should be softened before mixing, and every layer needs enough time to become cold and stable. Those small details make the difference between neat, visible layers and a dessert that becomes too loose when sliced. For general information about refrigerated foods and food safety, the U.S. Food and Drug Administration provides useful guidance.
This version has been written with those details in mind. Rather than simply telling you to mix, spread, and chill, I will show you what each mixture should look like and where things can go wrong.
JUMP TO
Orange Pineapple Creamsicle Lush
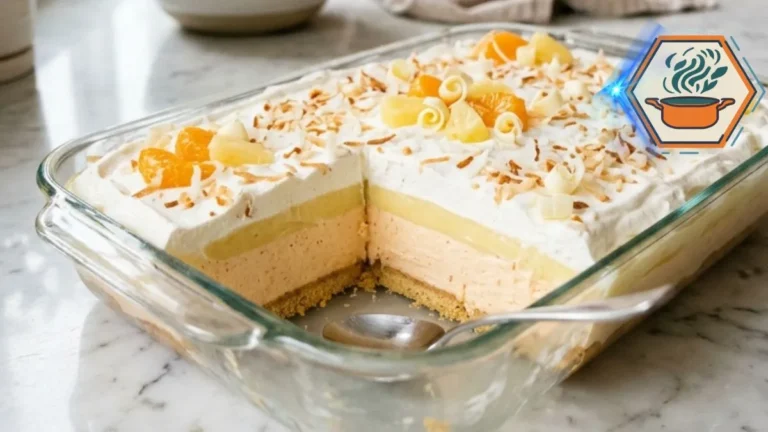
Orange Pineapple Creamsicle Lush is an easy no-bake layered dessert with a buttery vanilla wafer crust, fluffy orange cream cheese filling, creamy pineapple vanilla pudding, and whipped topping. Fresh orange zest, crushed pineapple, and toasted coconut give every chilled slice a bright tropical creamsicle flavor.
- Total Time: 6 hours 30 minutes
- Yield: 15 servings
Ingredients
Vanilla Wafer Crust
- 2 1/2 cups finely crushed vanilla wafers
- 1/2 cup (113 g) unsalted butter, melted
- 2 tablespoons granulated sugar
- 1/8 teaspoon fine salt
- 1 tablespoon additional melted butter, only if needed
Orange Cream Cheesecake Layer
- 16 oz (454 g) full-fat block cream cheese, softened
- 1 cup (120 g) powdered sugar
- 2 tablespoons finely grated fresh orange zest
- 1/3 cup (80 ml) fresh orange juice
- 1 teaspoon vanilla extract
- 8 oz (226 g) whipped topping, thawed in the refrigerator
Pineapple Cream Layer
- 2 boxes (3.4 oz/96 g each) instant vanilla pudding mix
- 3 cups (710 ml) cold whole milk
- 1 cup crushed canned pineapple, very well drained
- 1/2 cup (120 g) full-fat sour cream
Topping and Decoration
- 8 oz (226 g) whipped topping, thawed
- Orange segments, for garnish
- Pineapple tidbits, thoroughly drained and blotted dry
- Toasted coconut flakes
- White chocolate curls
- Candied orange peel, optional
- Fresh mint leaves, optional
Instructions
- Prepare the crust. Combine the finely crushed vanilla wafers, granulated sugar, and salt in a bowl. Pour in 1/2 cup melted butter and stir until all the crumbs are evenly moistened.
- Check the crust texture. Squeeze a small amount between your fingers. It should hold together. If the crumbs remain unusually dry and loose, mix in up to 1 additional tablespoon of melted butter.
- Press and chill. Transfer the crumb mixture to a 9×13-inch baking dish. Press it very firmly and evenly over the bottom using a flat-bottomed measuring cup. Refrigerate for 20 minutes.
- Prepare the cream cheese. Place the softened cream cheese in a large bowl. Beat with an electric mixer until completely smooth, about 1–2 minutes. Scrape down the bowl.
- Make the orange filling. Gradually beat in the powdered sugar. Add the orange zest and vanilla. Add the orange juice gradually on low speed until smooth.
- Fold in the whipped topping. Gently fold 8 oz whipped topping into the orange mixture with a spatula until evenly combined and fluffy.
- Add the orange layer. Spoon small portions of the orange filling across the chilled crust. Gently spread into an even layer without disturbing the crumbs. Refrigerate while preparing the next layer.
- Make the pudding. Add 3 cups cold whole milk to a clean bowl. Add both boxes of instant vanilla pudding mix and whisk for about 2 minutes, or until noticeably thick. Allow it to stand for several minutes.
- Finish the pineapple filling. Fold the sour cream into the pudding until smooth. Gently fold in the thoroughly drained crushed pineapple.
- Add the pineapple layer. Distribute spoonfuls of pineapple filling over the chilled orange layer. Spread gently into an even layer.
- Add the topping. Spoon the remaining 8 oz whipped topping over the pineapple layer and gently spread it to the edges.
- Chill. Cover the baking dish without allowing the covering to touch the topping. Refrigerate for at least 6 hours. For cleaner slices, refrigerate overnight.
- Decorate. Shortly before serving, garnish with well-drained orange pieces, blotted pineapple tidbits, completely cooled toasted coconut, white chocolate curls, candied orange peel, and optional mint.
- Slice and serve. Cut the chilled dessert with a sharp knife. Wipe the knife clean between cuts for more defined layers. Serve cold.
Notes
Drain the pineapple thoroughly. Excess pineapple juice can make the pudding layer loose and can eventually soften the crust.
Use instant pudding. Do not substitute cook-and-serve pudding without reformulating the recipe.
Use cold milk. The 3 cups of milk are for both pudding packages combined. Do not separately follow the milk quantities printed on the pudding boxes.
Use block cream cheese. Full-fat block cream cheese gives the orange layer better structure than spreadable cream cheese.
Add orange juice gradually. This helps keep the cream cheese filling smooth.
Do not skip the chill. Six hours is the minimum recommended chilling period. Overnight is preferable for neat squares.
Blot decorative fruit. Wet pineapple or orange pieces can release liquid over the whipped topping.
Cool toasted coconut completely before putting it on the dessert.
Crust test: If the crumbs hold together when squeezed, do not add the optional tablespoon of butter.
- Prep Time: 30 minutes
- Cook Time: 0 minutes
- Category: Dessert
- Method: No-bake
- Cuisine: American
What Is Orange Pineapple Creamsicle Lush?
Orange Pineapple Creamsicle Lush is a chilled layered dessert inspired by two familiar flavor combinations: orange and vanilla, plus pineapple and cream.
The bottom begins with crushed vanilla wafers mixed with melted butter. A small amount of sugar and salt makes this version more dependable and flavorful. The crumbs are pressed tightly into a 9×13-inch pan and chilled until firm.
Next comes an orange cream cheese filling. Fresh orange zest provides most of the citrus aroma. Orange juice adds fresh flavor, while vanilla and whipped topping soften the sharper notes of the cream cheese.
The third layer combines instant vanilla pudding, cold milk, sour cream, and crushed pineapple. Finally, a generous whipped topping creates the white top seen in the finished dessert.
The layers give each bite several textures:
- Buttery and slightly crumbly on the bottom
- Dense but creamy through the orange layer
- Silky and fruity through the pineapple layer
- Light and fluffy on top
- Slightly crisp if toasted coconut is added before serving
It is rich, so small squares work well.
Why This No-Bake Dessert Works
A good lush is not simply a collection of sweet mixtures stacked in a pan. Each layer has a job.
The cookie base supports everything above it. The orange cream cheese layer gives the dessert body. The pudding layer adds a softer texture and carries the pineapple. The whipped topping provides a lighter finish.
There is also an important flavor balance.
Orange juice can taste sharp on its own. Cream cheese and vanilla soften that acidity. Pineapple contributes sweetness and tropical fruit flavor. A little salt in the crust keeps the entire dessert from tasting one-dimensional.
Current pineapple-lush recipes use the same general principle of a crumb base followed by chilled creamy layers, although recipes vary considerably in their exact fillings.
The orange-pineapple combination gives this version its own identity.
Ingredients You’ll Need
For the Vanilla Cookie Crust
- 2½ cups finely crushed vanilla wafers
- ½ cup unsalted butter, melted
- 2 tablespoons granulated sugar
- ⅛ teaspoon fine salt
The original ingredient list uses only vanilla wafers and butter. That can work, but the added sugar helps bind the fine crumbs while the small amount of salt balances the sweetness.
The crumbs matter too. Large cookie pieces create weak spots. Aim for a texture similar to coarse sand.
For the Orange Cream Cheesecake Layer
- 16 ounces full-fat block cream cheese, softened
- 1 cup powdered sugar, sifted if lumpy
- 2 tablespoons finely grated fresh orange zest
- ⅓ cup fresh orange juice
- 1 teaspoon vanilla extract
- 8 ounces whipped topping, thawed in the refrigerator
Use block cream cheese, not whipped cream cheese from a tub. The latter can produce a softer filling.
The cream cheese should be soft enough to beat smoothly but should not be warm or melted.
For the Pineapple Cream Layer
- 2 boxes (3.4 ounces each) instant vanilla pudding mix
- 3 cups cold whole milk
- 1 cup crushed pineapple, very well drained
- ½ cup full-fat sour cream
Use instant pudding rather than cook-and-serve pudding.
For predictable results, canned crushed pineapple is the easiest choice here. Drain it thoroughly before measuring it into the filling.
For the Topping
- 8 ounces whipped topping, thawed, or enough to create a generous top layer
- Orange segments or thin orange pieces
- Well-drained pineapple tidbits
- Toasted coconut flakes
- White chocolate curls
- Candied orange peel
- Fresh mint, optional
The original recipe says to top the dessert with whipped cream but does not give a quantity. About 8 ounces of whipped topping gives a 9×13-inch dessert a generous visible layer similar to the reference presentation.
You do not need every garnish. Orange, pineapple, and toasted coconut are enough to communicate the main flavors.
Equipment
You do not need unusual equipment.
Have these items ready:
- 9×13-inch baking dish
- Large mixing bowl
- Medium mixing bowl
- Electric hand mixer or stand mixer
- Balloon whisk
- Flexible silicone spatula
- Measuring cups and spoons
- Fine citrus zester
- Fine-mesh strainer
- Flat-bottomed measuring cup or glass
- Sharp knife
- Paper towels
A flat-bottomed cup is especially useful for compacting the crust.
Before You Start: Three Details That Matter
The recipe becomes much easier when you prepare three ingredients correctly.
1. Soften the cream cheese
Cold cream cheese does not blend easily with powdered sugar and orange juice. Small lumps can remain even after several minutes of mixing.
Set out the unopened amount only long enough to soften appropriately before preparation, rather than leaving dairy ingredients sitting out for extended periods.
2. Keep the milk cold
Instant pudding is designed to thicken quickly when prepared. Start with refrigerator-cold milk.
Do not prepare the pudding according to the directions printed on the package. For this recipe, use the 3 cups of milk specified here for both boxes combined.
That lower liquid ratio is intentional. We need a thick layer that can hold a square shape after chilling.
3. Drain the pineapple aggressively
This deserves more attention than the simple instruction “well drained.”
Place the crushed pineapple in a fine-mesh strainer. Let the excess juice run off. Then gently press the pineapple with the back of a spoon.
Transfer it to several layers of paper towel if it still looks wet and lightly blot it.
Do not squeeze until completely dry. You still want juicy fruit flavor.
You simply do not want free liquid entering the pudding.
How to Make the Vanilla Wafer Crust
Start by crushing the vanilla wafers.
A food processor makes the most even crumbs. If you do not have one, put the cookies in a sturdy food-storage bag and crush them with a rolling pin.
Measure 2½ cups after crushing.
Combine the crumbs, granulated sugar, and salt in a bowl. Pour in the melted butter.
Stir until every crumb looks evenly moistened.
Pick up a spoonful and squeeze it gently. It should hold together rather than immediately falling apart.
If your particular brand of wafers is unusually dry and the crumbs refuse to hold when firmly pressed, mix in 1 additional tablespoon of melted butter. Do not pour in a large amount at once. Too much butter can make the base greasy and overly hard when cold.
Transfer the crumbs to a 9×13-inch dish.
Spread them evenly before you begin pressing.
Now use the flat bottom of a measuring cup to compress the crumbs. Start in the middle and work toward the corners.
Firm pressure is important.
A loosely packed base may taste fine, but it will crumble when you try to remove the first square.
Refrigerate the crust for at least 20 minutes.
Because this is a true no-bake version, the refrigerator does the setting rather than the oven.
How to Make the Orange Cream Cheese Layer
This is where the creamsicle character begins.
First, finely zest a clean orange. Remove only the colored outer peel. Avoid digging deeply into the white pith because it can contribute unwanted bitterness.
You will need about 2 tablespoons of zest.
Juice the orange separately and measure ⅓ cup.
Place the softened cream cheese in a large bowl. Beat on medium speed until completely smooth, about 1 to 2 minutes. Scrape the sides and bottom of the bowl.
Add the powdered sugar gradually.
Beat again until smooth.
Add the orange zest and vanilla.
Then add the orange juice gradually rather than all at once, beating on low speed between additions. This makes it easier to keep the cream cheese mixture smooth.
Once incorporated, stop using the mixer.
Add the thawed whipped topping in two or three additions. Fold it through with a spatula.
Do not aggressively beat the whipped topping into the filling. Folding preserves more of its airy texture.
The finished mixture should look smooth, pale orange to cream-colored, and fluffy.
Building a Clean First Layer
Remove the chilled crust from the refrigerator.
Drop spoonfuls of orange filling across the entire surface rather than putting one large mound in the center.
Why?
If you place all the filling in one spot and push it outward, you can drag the cookie crumbs with it.
Use an offset spatula or the back of a spoon to join the small mounds together.
Spread gently toward the corners.
Aim for an even layer with a relatively flat top.
Return the pan to the refrigerator while you make the pineapple pudding.
That short rest gives the orange layer extra time to firm.
How to Make the Pineapple Cream Layer
Pour 3 cups cold whole milk into a clean mixing bowl.
Sprinkle in both packages of instant vanilla pudding mix.
Whisk according to the package’s basic mixing method, usually around 2 minutes, until noticeably thick.
Let the mixture stand for a few minutes.
It should be substantially thicker than when you started.
Now fold in the sour cream.
Once the mixture is uniform, fold in the thoroughly drained crushed pineapple.
Do not add reserved pineapple juice.
The finished pineapple filling should be thick enough to sit on a spoon. It should not pour like a beverage.
If it looks unexpectedly loose, do not immediately add it to the dessert. Give the pudding a few more minutes in the refrigerator and confirm that you used instant pudding and the correct amount of milk.
Why Drained Pineapple Matters So Much
Pineapple contains plenty of juice. That juice is delicious, but excess liquid works against the structure of this dessert.
The problem becomes more noticeable after several hours in the refrigerator. Liquid can migrate between layers, softening the base and loosening the pudding.
This is why draining is not a throwaway instruction.
It is one of the key techniques in the recipe.
There is another reason canned pineapple is convenient in creamy desserts. Fresh pineapple contains bromelain, a protein-degrading enzyme. This is especially relevant in preparations whose structure depends on proteins such as gelatin. Heating pineapple deactivates that enzyme.
This recipe does not rely on gelatin, but canned crushed pineapple remains the simplest option for consistent texture and moisture control.
Add the Pineapple Layer Without Mixing the Layers
Take the pan from the refrigerator.
Again, avoid dropping the entire pineapple mixture into the center.
Place spoonfuls across the orange filling.
Use very light pressure to spread them together.
The goal is to create distinct layers rather than swirling pineapple pudding into the orange cream cheese.
Work from one side to the other.
Smooth the surface once, then stop.
Repeatedly running a spatula across the top can pull up the layer underneath.
Add the Whipped Topping
Spread approximately 8 ounces of thawed whipped topping over the pineapple layer.
This creates the thick white finish that gives the dessert its classic lush appearance.
Start with small dollops over the surface.
Then gently join them together.
For the cleanest appearance, make the top reasonably flat but leave a few soft swirls. They catch the toasted coconut and white chocolate beautifully.
At this point, the dessert is assembled.
But it is not ready to slice.
The Six-Hour Chill Is Part of the Recipe
Cover the dish without pressing the covering into the whipped topping.
Refrigerate for at least 6 hours.
Overnight is even better.
This time allows the layers to become thoroughly cold and gives the cookie base time to settle.
A rushed lush can look perfect inside the pan and collapse as soon as you lift out a square.
For a party, make it the evening before.
That removes dessert preparation from your schedule on the day of the gathering.
How to Decorate It Like the Reference Dessert
The finished dessert should have a thick white topping with warm orange accents and toasted coconut scattered across the surface.
For a similar presentation, use:
- Small orange segments
- A few pineapple tidbits
- Toasted coconut flakes
- Thin white chocolate curls
- Small pieces of candied orange peel
Mint is optional.
Keep the decorations restrained. Too much fruit on top adds weight and moisture.
Most importantly, drain and blot pineapple tidbits before placing them on the whipped layer.
For toasted coconut, toast it separately and let it cool completely before decorating the chilled dessert.
Warm coconut should never go directly onto whipped topping.
If you enjoy learning how small finishing techniques can change desserts, the RecipesMind guide to mastering caramelized sugar covers another useful dessert skill.
How to Get Clean, Beautiful Squares
The first square is always the hardest.
Start with a fully chilled dessert.
Use a sharp, thin-bladed knife. Run the knife straight down rather than sawing aggressively through the layers.
Wipe the blade clean after every cut.
For 12 generous portions, cut the pan into 3 by 4 sections.
For 15 smaller servings, cut it into 3 by 5 sections.
Use a thin serving spatula to reach underneath the crust.
If appearance matters for photographs or a party table, remove a corner piece first. Once that space is open, the remaining pieces become much easier to lift cleanly.
Keep the dessert chilled until close to serving time.
What Does Orange Pineapple Creamsicle Lush Taste Like?
The first flavor is creamy vanilla-orange.
Then pineapple appears.
Fresh orange zest gives the filling a brighter citrus aroma than orange juice alone. The pineapple contributes a sweet, slightly tangy tropical note.
Cream cheese provides richness, but this is not quite the same experience as a dense baked cheesecake.
The pudding layer is softer. The whipped topping is lighter. The vanilla wafer crust adds a buttery cookie finish.
Together, those textures create the “lush” effect.
If you like fruit-forward desserts, you may also enjoy learning what strawberry puree is made from or reading the RecipesMind guide on using pineapple in baking.
Common Mistakes and How to Avoid Them
The crust falls apart
This usually happens because the crumbs are too coarse, the mixture is under-compacted, or there is not enough butter for the particular cookies used.
Crush the wafers finely and press firmly.
The crust should feel compact before it enters the refrigerator.
The crust is greasy
Too much melted butter can have the opposite effect.
Measure the crumbs after crushing and measure the butter accurately.
Only use the optional extra tablespoon if the original mixture clearly will not hold together when squeezed.
The cream cheese filling has lumps
The cream cheese was probably too cold or was not beaten smooth before the other ingredients were added.
Beat the cream cheese by itself first.
Then add powdered sugar.
Add the orange juice gradually.
The pineapple layer is runny
Several issues can cause this:
- Pineapple was not sufficiently drained.
- Too much milk was used.
- Cook-and-serve pudding was substituted for instant pudding.
- The pudding did not have time to thicken.
- Ingredients were measured incorrectly.
Do not compensate for a very wet pineapple layer by adding random amounts of dry pudding mix. Fixing the source of the extra liquid gives more predictable results.
The layers blend together
The lower layer may have been too warm or too soft.
It can also happen when the next filling is spread too aggressively.
Use chilled ingredients where specified. Give the orange layer a brief refrigerator rest before adding the pineapple mixture. Spread each new layer using small dollops and gentle strokes.
The dessert will not hold its shape
It may simply need more chilling time.
Six hours is the minimum recommended time here.
Overnight chilling is ideal when clean presentation matters.
Make-Ahead Instructions
This dessert is made for advance preparation.
Prepare the crust and all three creamy layers the day before serving. Cover the pan and refrigerate overnight.
I prefer adding the decorative fruit closer to serving.
Why?
Fruit can slowly release moisture onto the whipped topping. Toasted coconut can also lose some of its crisp texture in the refrigerator.
Making the base dessert ahead while saving the finishing touches for later gives you the best combination of convenience and presentation.
Storage
Because this dessert contains cream cheese, milk, sour cream, and whipped topping, treat it as a refrigerated dessert.
Keep it covered in the refrigerator when it is not being served.
Use clean utensils when removing portions, particularly if you plan to keep leftovers.
For gatherings, avoid leaving the whole pan sitting on a warm outdoor table for long periods. Serve portions and return the main dish to refrigeration.
Can You Freeze It?
Freezing is possible, but it is not my first choice for this recipe.
Creamy dairy mixtures can change texture after freezing and thawing. Cream cheese, in particular, can become less smooth after freezing.
For the best creamy texture, make the dessert ahead and refrigerate it overnight rather than freezing it.
If you do freeze leftovers, expect the thawed texture to differ somewhat from a freshly refrigerated batch.
Ingredient Substitutions
Can I use graham crackers?
Yes.
They will change the flavor from vanilla-cookie sweetness to a more traditional graham crust.
Use finely ground crumbs and judge the butter by texture. Different cookies absorb fat differently.
Can I use reduced-fat cream cheese?
Full-fat block cream cheese is the safer choice when appearance and structure matter.
Lower-fat products can produce different texture and moisture levels.
Can I use homemade whipped cream?
You can, but ordinary homemade whipped cream does not always behave exactly like commercial whipped topping during long refrigeration.
If using homemade cream, a stabilized version is better for a make-ahead layered dessert.
Can I use mandarin oranges?
Yes, as a garnish.
Drain them very well and blot away surface syrup or juice before placing them on the topping.
Can I add more orange juice?
I would not add a large amount.
Extra juice means extra liquid, which can soften the cream cheese layer.
If you want stronger orange flavor, increase the zest slightly instead of pouring in much more juice.
That keeps the filling more stable.
Serving Ideas
This dessert works particularly well when you need something cold and make-ahead.
Try it for:
- Summer cookouts
- Easter gatherings
- Mother’s Day
- Birthday parties
- Family reunions
- Picnics with proper cold storage
- Potlucks
- Backyard dinners
- Holiday dessert tables
Serve it straight from the refrigerator.
It pairs naturally with fresh berries or other simple fruit on the side. You do not need a heavy sauce because the dessert is already creamy and sweet.
For another chilled dessert idea, see this RecipesMind Jell-O pudding pie guide.
How to Make the Orange Flavor Stronger Without Making It Runny
This is one of the most useful techniques in the recipe.
Use zest.
Orange juice contains flavor, but it also adds water and acidity. Pouring more juice into a cream cheese mixture changes its consistency.
Zest contains intensely aromatic oils from the outer peel.
Finely grated zest therefore adds strong citrus character without adding a comparable amount of liquid.
Use a fine grater and stop when you reach the white pith.
For an even stronger aroma, rub the zest gently into the powdered sugar before adding it to the cream cheese.
The orange fragrance becomes much more noticeable.
How to Toast Coconut for the Topping
Place coconut flakes in a dry skillet over low to medium-low heat.
Stir frequently.
Remove the pan as soon as the coconut develops patches of pale golden brown.
Do not walk away.
Coconut can move from pale to overly dark quickly.
Transfer it immediately to a cool plate. Leaving it in the hot skillet means it can continue browning after the heat is switched off.
Cool completely before placing it on the dessert.
This small step gives the soft dessert a useful textural contrast.
How to Make White Chocolate Curls
White chocolate curls are optional, but they help recreate the polished look of the reference dessert.
Start with a firm piece of white chocolate.
Use a vegetable peeler along an edge to create thin shavings.
If the chocolate breaks into tiny fragments, let it become slightly less cold and try again.
If it becomes too soft, refrigerate it briefly.
Scatter the curls lightly across the whipped topping rather than covering the entire surface.
The orange and toasted coconut should remain visible.
The Best Texture Comes the Next Day
This may be the most convenient feature of the entire recipe.
Immediately after assembly, the individual mixtures are prepared but have not had much time to settle.
Several hours of refrigeration changes that.
The dessert becomes colder and easier to portion. The crumb base becomes cohesive. The creamy layers become more pleasant to cut.
That is why the overnight option is more than a scheduling trick.
It can improve the serving experience.
Picture making the dessert after dinner on Friday night. By Saturday afternoon, there is no mixer to clean and no oven to heat. You simply decorate the cold pan, cut the first square, and bring it to the table.
That is exactly the kind of recipe worth keeping for busy gatherings.
Frequently Asked Questions
What is Orange Pineapple Creamsicle Lush made of?
It is a layered no-bake dessert made with a vanilla wafer crust, orange cream cheese filling, pineapple-vanilla pudding, and whipped topping. Orange zest, pineapple, vanilla, and creamy dairy ingredients create its creamsicle-inspired flavor.
Does Orange Pineapple Creamsicle Lush need to be refrigerated?
Yes. It contains several perishable dairy ingredients and is designed to be served cold. Keep it refrigerated before serving and refrigerate leftovers promptly.
How long does a lush dessert need to chill?
For this recipe, allow at least 6 hours. Overnight chilling is preferred when you want firm, clean squares.
Why is my pineapple lush runny?
The most common causes are excess pineapple juice, too much milk, the wrong type of pudding, or insufficient chilling.
Drain the pineapple thoroughly and use instant pudding with the exact quantity of cold milk specified in the recipe.
Can I make Orange Pineapple Creamsicle Lush the night before?
Yes. In fact, making it the night before is one of the best ways to prepare it. The extended refrigeration gives the layers plenty of time to become cold and settled.
Can I use fresh pineapple instead of canned pineapple?
Canned crushed pineapple is recommended for this version because its texture and moisture are easier to control. Fresh pineapple contains active bromelain, an enzyme that can break down proteins in certain dairy- or gelatin-based preparations; heating deactivates the enzyme.
Why won’t my vanilla wafer crust stay together?
The crumbs may be too coarse, not packed firmly enough, or slightly too dry.
Grind them finely. Mix thoroughly with butter and press the crust firmly with a flat-bottomed cup.
If the measured mixture still will not hold when squeezed, add up to one extra tablespoon of melted butter.
Can I use orange extract?
A small amount can add orange flavor, but fresh zest gives this recipe a more natural citrus aroma.
If you use extract, start conservatively because strengths differ by product.
Can I use orange gelatin in this recipe?
Some orange creamsicle lush recipes use orange gelatin as part of the filling. This particular version does not need it. Fresh orange zest and juice give it its citrus character while preserving the cream cheese and pineapple pudding structure intended here.
Can I make this dessert without pineapple?
Yes, but it would become a different dessert. Pineapple provides the tropical contrast that distinguishes this recipe from a standard orange creamsicle lush.
How do I stop the layers from mixing?
Chill the crust first. Keep the orange layer cold while preparing the pudding. Add each new mixture as small spoonfuls distributed across the surface, then spread gently.
How do I get clean slices?
Chill the dessert overnight if possible. Use a sharp knife and wipe it clean between cuts. A thin serving spatula also helps lift the crust without breaking it.
What size pan should I use?
A 9×13-inch baking dish is ideal. It gives the ingredients enough surface area to form visible layers without making the finished squares excessively tall.
Final Kitchen Notes
The success of this Orange Pineapple Creamsicle Lush comes down to a few small choices.
Crush the vanilla wafers finely. Add enough butter for the crumbs to hold, but not so much that the base becomes greasy. Press the crust firmly. Start with smooth, softened block cream cheese. Add the orange juice gradually. Keep the milk cold. Most importantly, drain the pineapple extremely well.
Then give the refrigerator time to do its job.
Six hours works. Overnight is better.
When you finally cut into the pan, you should see the layers that make this dessert so inviting: a compact golden cookie base, a thick creamy orange center, a pale pineapple-vanilla layer, and a generous cloud of white topping finished with orange pieces and toasted coconut.
It looks festive, but the method remains approachable.
And that is the real appeal of this dessert. You can prepare it well before your guests arrive, keep the oven off, and still bring a striking layered dessert to the table.